Multimodal, Multi-Device Teaching with Visible Body: Spinal Anatomy
Instructors tell us that they want to engage their students and get more out of their classrooms’ tablets or interactive displays, like Anatomage Tables. Visible Body Courseware provides the features, content, and flexibility instructors need to teach visually dynamic A&P, health sciences, and biology courses!
To illustrate this, we will walk you through how you can teach spinal anatomy and pathologies by taking advantage of multiple technological resources.
Courseware allows instructors to leverage Visible Body’s digital asset library to create an engaging course. In addition, a Courseware subscription gives instructors and students access to Visible Body Suite, which contains all Visible Body’s 3D gross and microanatomy models, muscle actions, biology models and simulations, illustrations, histology slides, and more. Courseware users can download the VB Suite app on their phones or tablets to study on the go or use augmented reality (AR) mode.
There are tons of ways you can use Visible Body Courseware! We’ll cover how you and your students can use Courseware in conjunction with...
- Phones/tablets
- Plastic models
- Interactive displays
- Pen-and-paper lab activities
- Laptops
- Projectors
Let’s dive in!
Pre-Class Assignment
Device: Computer/laptop
Related blog post: How to Teach Muscle Naming with Immersive Assignments
To prepare your students for the class ahead, give them an assignment that covers the musculoskeletal and nervous system anatomy of the spine.
Assignments in Courseware are a little different than your average reading assignment. They create an “on the rails” experience, where students move through a sequence of 3D views, animations, histology slides, and/or quizzes. Instructions accompany each activity to keep students on task, but manipulating the 3D models encourages curiosity and self-driven learning.
To save instructors time and effort, the Visible Body team has put together a plethora of premade assignments that are ready to go. For example, take the premade assignment shown below that covers the muscle actions of the trunk and spinal column.
 An assignment in Courseware.
Looking for something different? You can modify a premade assignment to suit your needs, or you can make one from scratch using an intuitive drag-and-drop interface.
 Making an assignment in Courseware.
Review with Context
Device: Projector or interactive panel
Related blog post: How to Enhance Case Studies with Tours in VB Suite
It’s time for class! Begin class by reviewing key points from the homework assignment. By using a projector or moving an interactive panel into a vertical position, you can use the 3D models in VB Suite as a lecture aid. Rotate, dissect, and annotate the models as you review spinal anatomy to help draw connections.
Your students will soon move on to a series of activities around the classroom, one of which has to do with herniated discs. Exploring pathologies is a great way to get students engaged and thinking about problem solving. You can introduce this idea in your opening lecture, reviewing disc anatomy.

Using VB Suite as a visual aid.
Stations around the Classroom
For the bulk of class time, students will be split into groups and will move through three stations set up around the classroom. We suggest setting a timer for 10–15 minutes for each activity, but you can vary the time depending on your students and your class period. The stations will incorporate different ways of using Visible Body to learn about spinal anatomy.
Station #1: Virtual dissection
Device: Interactive display, like a ClearTouch screen or an Anatomage Table
Related blog posts: Visible Body on the Big Screen: Teaching with Interactive Panels, 5 Ways to Gamify Your A&P Classroom with Visible Body
Because Visible Body Suite is a web-based app, you can access it through the web browser on interactive panels, like ClearTouch panels or Anatomage Tables!
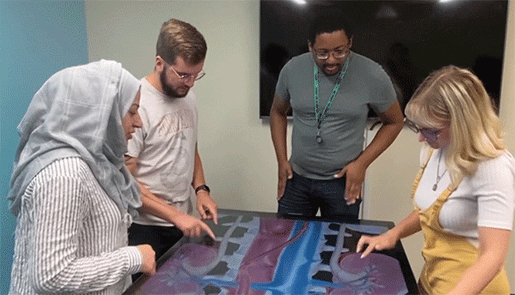
VB Suite on a ClearTouch panel.
To set up this station, open VB Suite, search "Back,” and scroll down until you see the Back view under the Gross Anatomy Lab subsection. This view will simulate a cadaver lab—if a cadaver lab had clear, distinct structures with built-in labels and descriptions.
When students reach this station, they will conduct a scavenger hunt! Generate a list of 5–10 prompts for students to puzzle out, such as:
- Find the bands that connect the laminae of adjacent vertebrae. What are they called?
- There are eleven of me on each side of the spine. What am I?
- Find an intercostal nerve and write down its name.
Working as a team, students will explore the model and write down their answers. To dissect structures away, students will click on a structure and then click “Hide” in the Info Box or use the Dissection tool found on the bottom toolbar. They can reset their view between prompts by clicking the Refresh button at the top of their screen. Make sure the view is reset for the next group of students!
Station #2: Get Creative with QR Codes
Device: Plastic models, phone or tablet
Related blog posts: 3 Ways to Use QR Codes in the Classroom with Visible Body Suite, Plastic Models + VB Suite: New Research Examines Engagement and Interest in A&P
Using digital tools doesn’t mean you have to give up on plastic models! In this activity, students will use QR codes and the VB Suite mobile app to identify structures, combining a tactile experience with a digital one.
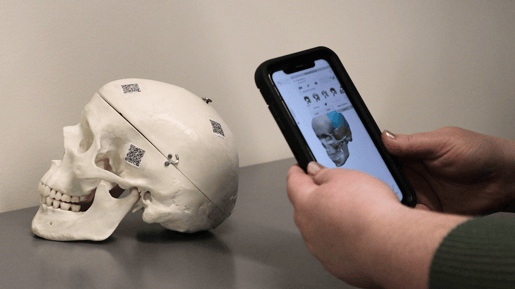 QR codes on a plastic skull.
You can generate a QR code for any view, Tour, or Flashcard Deck in a couple clicks by going to Share > Share Link > Download QR Code. Print them off and tape them onto the desk or directly onto the plastic model!
Students will work through a page or so of a lab activity—for example, Visible Body's premade lab activities for the Muscles of the Abdomen and Thorax and the Spinal Cord and Nerves—using the plastic model and VB Suite as a guide.
When Dr. Katelyn Wood started using Visible Body in her A&P course at Western University, she found that her students loved using plastic models in conjunction with VB Suite. For one, they felt more confident identifying structures when they had VB Suite for reference.
"[Another thing] that students really loved is they were able to see flexion or abduction—they could see those muscles actually moving, which is something you don't get from plastic models,” said Dr. Wood.
Don’t want to do a lab activity? Try Flashcards! Choose or modify a Deck from our library of premade Flashcard Decks, or you can build your own. Students can save Flashcard Decks to their devices for future studying.
Station #3: Augmented Reality
Device: Phone or tablet
Related blog post: A Lesson Plan in AR: Five Interactive Muscle Actions in Augmented Reality
In this AR activity, students will practice stretches used by people with herniated discs.
Students will partner up and take turns. One student will perform the stretches (if able), while the other student uses AR to overlay a muscle action in VB Suite.

Using AR mode in the VB Suite mobile app, included as part of Courseware.
Use the Search tool to find the muscle action animations mentioned, or, from the VB Suite menu, click on Muscles & Kinesiology and then click on the Muscle Actions tab. Tap the AR button in the corner, click on the box to place your model, and voilà!
These muscle actions connect to stretches for herniated discs:
- Head/Neck Flexion
- Spine Extension and Flexion models (simulating the "cat-cow" stretch)
- Hip Flexion
As one student slowly performs the muscle action, the other student will stand behind them, using AR as an overlay or positioning it beside their partner. They can tap on the muscles to learn more, and using the Fade or Hide feature, the student can differentiate between muscles.
After both students have had their turns, they can reflect. Using what you know about spinal anatomy, why are these stretches helpful for people with herniated discs?
Assessment
The last thing we are going to cover in this blog post is assessment! By using a multitude of devices, your students have learned about the skeletal, muscular, and nervous structures of the spine, and now they are ready to be graded on what they know.
Assessment in Courseware is done through quizzing. Like with all our other classroom features, you can choose from premade quizzes and questions, or you can create your own. You can use or create multiple choice, short answer quizzes—or a dissection quiz! Dissection quizzes make assessment more interactive by challenging students to use their visuospatial skills to find and identify 3D structures.

Image from Courseware.
Dissection and multiple choice quizzes are automatically graded, and grades are logged in the Gradebook. The Courseware Gradebook can be integrated with Canvas, and it can be easily exported to other LMSs.
This blog post was just the tip of the iceberg when it comes to Visible Body content and features. We hope you’ll stick around to learn more!
Be sure to subscribe to the Visible Body Blog for more anatomy awesomeness!
Are you an instructor? We have award-winning 3D products and resources for your anatomy and physiology course! Learn more here.

