A Lesson Plan in AR: Five Interactive Muscle Actions in Augmented Reality
For this group exercise on muscle action in augmented reality, divide your students into five groups, with one student to act as the model for each action that you will examine today: shoulder abduction; head neck lateral flexion; spine lateral flexion; and hand digit extension.
Equipped with their devices, those students not acting as models should then open Visible Body Suite, navigate to the muscle action specific to their group, turn on augmented reality mode, and direct their device at their student model.
Muscle Action Example I: Shoulder Abduction
The prime movers involved in shoulder abduction are the deltoid and supraspinatus.
Have your students perform a few slow-motion jumping jacks, with special attention paid to the shoulder movement during this action. If exercise equipment is available or you are in a physical therapy education environment, the lateral dumbbell raise also provides an example of a common shoulder abduction exercise.
 GIF created using VB Suite.
After students have selected the shoulder abduction muscle action in VB Suite, instruct them to position themselves so that they are afforded a posterior view of their model. Instruct them to select and Fade the trapezius to get a better view of one of the two prime movers, the supraspinatus, and Fade the deltoid to allow a clear view of the moving ball and socket joint beneath.
By placing the shoulder abduction animation in augmented reality mode next to a student, other students can view the agonists and antagonists at work. In shoulder abduction the agonist is the supraspinatus and the antagonist is the pec major, though we will save delving into the pec major for another lesson! Originating from the acromion and attaching at the midshaft of the humerus, it is the deltoid muscle, easily observable on the AR model, which lifts the arm, and later in adduction, the pec major and lats that take over to move the arm back toward the body.
Muscle Action Example II: Head/Neck Lateral Flexion
The primary movers in lateral head/neck flexion include the sternocleidomastoid, anterior scalene, middle scalene, posterior scalene, splenius capitis, and splenius cervicis.
To demonstrate head/neck lateral flexion, ask students to (slowly and without raising their shoulders) attempt to touch their ears to the tops of their shoulders. The key here is the isolated lateral movement away from the midline of the body; moving the head toward the shoulder (left or right) from a point below the skull.

GIF created using VB Suite.
From a posterior view with AR enabled, ask students to alternate using the Fade and Hide functions on some of the surrounding muscles involved in lateral flexion. Hiding the sternocleidomastoid, for example, given its size, will allow students to view relevant muscles below, and comprehend the multi-layered nature of the muscular system that works in synergy to enable this action.
Muscle Action Example III: Spine Lateral Flexion
The primary movers in spine lateral flexion are the ipsilateral: erector spinae, quadratus lumborum, latissimus dorsi, internal oblique, external oblique, scalenes, splenius capitis, and splenius cervicis.
To offer an everyday application for this action (as well as to get in a good stretch), suggest that your students try a side-bending stretch, which is particularly effective for targeting the quadratus lumborum, a group of muscles that can get tight and painful when one spends a good deal of time sitting at a desk, and which aids (along with others) in spine lateral flexion. Instruct students to stand with their legs slightly apart, then reach their left arms over their heads and bend to the right as if attempting to touch the toes on their left feet. In addition to providing a visual representation of this muscle action, this action stretches many of the muscles on the left side of the body that are incorporated in spine lateral flexion. Bend to the opposite side to stretch the same muscles on the right side of the body.

GIF created using VB Suite.
Given the volume of primary movers involved in spine lateral flexion, using AR mode here in particular can help students examine the complex anatomy and physiology involved in spinal movements, and grasp the interplay of muscles and bone involved. With devices in hand, have students walk around his or her model to afford a view of the muscles flexing and extending from both a posterior and an anterior angle. Using the Fade and Dissect tools on the AR model, students can differentiate between muscles that otherwise may be obscured or overlaying others during this complex muscle action, thus affording an understanding of how these muscles function in synergy.
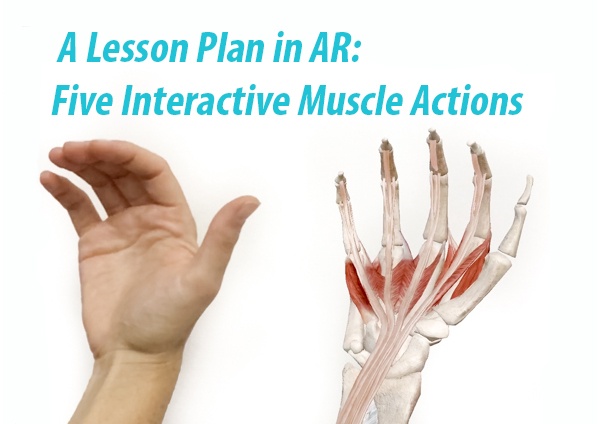
Muscle Action Example IV: Digit 2-5 Extension
The primary movers involved in hand digit 2-5 extension are the extensor digitorum, extensor indicis, extensor digiti minimi, lumbricals (interphalangeal joints) palmar and dorsal interossei (interphalangeal joints).
In demonstrating the prevalence of digit extension, begin by asking students, “When was the last time you used your hands?” It’s a silly question, of course, much like asking someone if they grabbed the steering wheel of a car lately, or picked up a cup of coffee or a phone. None of these actions would be possible without the ability to extend your fingers.
 GIF created using VB Suite.
Students should ensure their augmented reality model’s hand is scaled appropriately to most accurately match their student model’s. It might not be a perfect match; however, having the two as closely aligned as possible will allow students to accurately compare the physical and virtual reality models, and register certain anatomical features of the hand made more apparent through the comparison. For example, it’s one thing to read that the human hand has 27 bones (not including the sesamoid), but actually seeing all of them work together however, allows us to perform immensely delicate operations every day, will drive these anatomy and physiology lessons home with clarity and appreciation. By turning on the nervous, vasculature, or other systems located within the menu to the left of the screen, students can observe the intricate web of veins and nerves that accompany muscles and bones to comprise this extremely useful appendage.
Muscle Action Example V: Foot Dorsiflexion
The primary muscles involved in dorsiflexion are the tibialis anterior, extensor digitorum longus, and the extensor hallucis longus.
Dorsiflexion is easily demonstrated by asking students to stand with both feet flat on the ground, then lift the ball of one foot up off the ground while the heel of that foot remains firmly on the ground. As a little etymology quiz for your students, first inquire if they know the origin of the term “dorsiflexion”? If not, take the opportunity to give a brief anatomy etymology lesson. While the sole of the foot is called the plantar surface, the top of the foot is called the dorsum of the foot. Therefore, when you extend your foot, it's called plantar flexion, and, inversely, when you flex your foot upwards towards your head it's called dorsiflexion!

GIF created using VB Suite.
Any students squeamish about feet may have to grimace through this exercise as removing a shoe will be necessary to properly afford a representation of dorsiflexion. To avoid risk of injury and provide students a clear vantage point of the plantar as well as dorsal sides of the foot during this action, have the student model seated in a chair or on a flat surface sufficiently elevated to allow the student model’s foot to hang several inches off the ground. The observing students should then adjust their individual AR models to align its foot with the student model’s, then press play on the dorsiflexion virtual animation.
While not crucial, this and the aforementioned muscle actions are most educationally effective when demonstrated while the student model performs the muscle action in near exact, if not precisely exact, accord with each observing student’s AR model. As such, if possible, ensure all student models are also equipped with a device that will allow him or her to match the pace, as well as start and stop time, of the augmented reality model’s muscle action.
Next steps:
Ask student observers to rotate into the next muscle action group and the models to rotate out of his or her position. Repeat until all student observers and models have observed all five muscle actions in reality and augmented reality.
Be sure to subscribe to the Visible Body Blog for more anatomy awesomeness!
Are you a professor (or know someone who is)? We have awesome visuals and resources for your anatomy and physiology course! Learn more here.

