5 Tech Tips for Courseware Instructors
Instructors come to Courseware with varying degrees of comfort using web and mobile apps, and the customer support team at Visible Body are experts at helping instructors set up their Courseware accounts and answering questions from new and experienced users alike. As the spring semester wraps up and instructors prepare for summer classes, we thought we would share some tech tips inspired by the types of questions our Customer Support Team and Customer Engagement Team answer every day.

The VB Customer Engagement team recently hosted a webinar on this very topic. You can check it out here:
If you’d like to receive the latest VB news and invites to our webinars and Office Hours sessions, click here to sign up for our email list!
1. Basic terminology: browsers, windows, and tabs
First, let’s go over some key terms. These will be helpful to understand when using Courseware or working through tutorials on the VB Support Site.
Courseware itself is a web-based platform. This means it runs in your web browser (internet browser, or just browser). At the most basic level, a browser is software that allows you to view webpages on your computer or mobile device when you’re connected to the internet. You’re most likely using a browser to access this page right now! Examples of web browsers commonly used to access Courseware include Google Chrome, Safari, Firefox, and Microsoft Edge.
One common piece of advice our support team gives for Courseware and the web versions of Visible Body’s apps is to make sure you’re running the latest version of your browser. Many browsers will update automatically, but if you want to check to make sure your browser is up to date (and update it if it isn’t), here’s how to do that in the popular browsers mentioned above:
If you want to learn more about what hardware and software you’ll need to run Courseware, this VB blog post goes into more detail about system requirements.
One convenient feature offered by modern web browsers is that you can switch between multiple web pages using different tabs in the same browser window. If you’re a Google Chrome user, here are some additional tips for organizing (and even customizing) the tabs in your browser.
You’ll notice that in Courseware, clicking on a module, 3D view, or quiz in an assignment will open a new tab. This happens for two reasons. The first is that assignments and quizzes in Courseware are completed in either one of the web apps or our quiz engine. The second is that assignments often contain multiple learning modules, views, or quizzes. Having two windows makes it easier for students to head back to the assignment page once they’ve completed one module or quiz and start the next one.
 Tabs for an assignment page in a Courseware course and the A&P web app.
2. Troubleshooting: clearing your cache and cookies
A common first step to tech troubleshooting when using a web-based platform or app like ours is clearing your browser’s cache, and sometimes its cookies as well.
The cache is a series of files that your browser saves after visiting a webpage to make it easier to load that page again more easily later. Cookies (also known as HTTP cookies or web cookies) are files that keep track of your activity on a website. Cookies have many different functions: some check to see if you are logged in to a website, and others are used for keeping items in your cart when you’re shopping online.
Why is it useful to clear your cache? Sometimes, the cache holds onto outdated information (older image files, for example), which means that you may encounter errors if that webpage has updated and you haven’t cleared your cache in a while. Clearing cookies can improve performance, but it will also likely clear out usernames and passwords you have saved, so you will have to log in to sites again the next time you visit them.
In most browsers, you can go to your settings or browsing history to clear your cache and/or cookies. Here’s a handy guide for clearing your cache/cookies in Chrome, Edge, Firefox, and Safari for desktop computers. If you’re on a mobile device, here’s how to do the same thing in Safari for iOS and Chrome for iOS or Android.
3. The difference between Visible Body's web and mobile apps
A Courseware subscription includes access to both web and mobile versions of Visible Body’s apps (Human Anatomy Atlas, Anatomy & Physiology, Muscle Premium, and Physiology & Pathology). Instructors often ask about the various differences between the web apps and the mobile apps, so here is a brief explanation for your reference. Hopefully, you will find it helpful!
The web apps are the main way in which students and instructors will interact with VB content in Courseware. They are what students will use to complete assignments such as learning modules in A&P or 3D views in Human Anatomy Atlas.
The web apps are versions of the apps that run right in a browser window, so you don’t have to download any additional software to use them. This means that you and your students can use the web apps on any computer with an up-to-date web browser and access to the internet.
There are two ways to open the web apps in Courseware. The first is simply to open an assignment in Courseware that contains content from a VB app—as mentioned above, the web version of the appropriate app will open in a new tab. The other way to get to the web apps is to head to the My Apps page. At the top of that page, you’ll see the My Web Apps section, where you can click on the icon of the app you’d like to open and it will launch in a new tab for you.
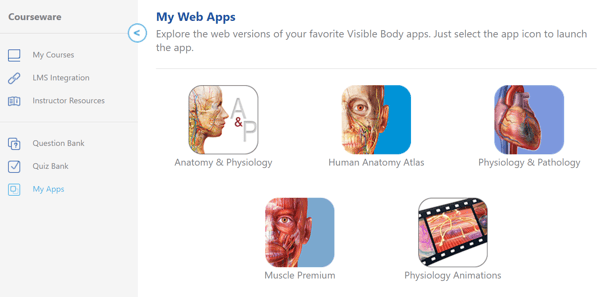 The web part of the "My Apps" page in Courseware.
The mobile apps allow you and your students to access VB’s apps on the go (and offline!). The key difference between the mobile and web apps is that students can’t complete Courseware assignments using the mobile apps—they’re just for reference or creating Views and Tours for studying and sharing.
Scroll down to the My Mobile Apps section of the My Apps page to download the mobile apps to your device.
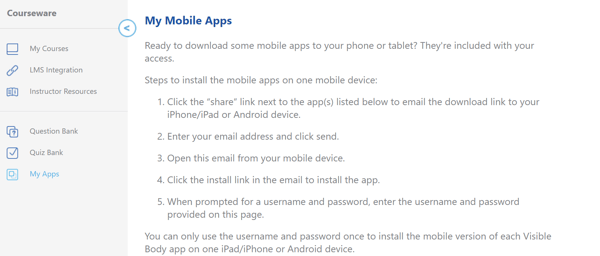 The mobile part of the "My Apps" page in Courseware.
With the new Visible Body User Accounts feature in Human Anatomy Atlas, you can sync content across the web and mobile versions of Atlas. This means that if you want to make a View or a Tour using Atlas on your phone, all you need to do is log in to the app with your Courseware credentials and you’ll be able to see any custom content you save while you’re on your phone the next time you open the web app on your computer. Cool, right?
(Quick note! If you already have saved content from Atlas 2020 and you don’t see it in Atlas 2021, follow the instructions in this support article to transfer your custom content.)
4. Using the screen record feature in PowerPoint
Lots of instructors like using PowerPoint during lectures either in the classroom or online, but did you know that you can use the screen recording feature in PowerPoint to add video capture from Visible Body to your presentation? This is especially useful if you’re teaching a topic like muscle actions—all you need to do is capture the animated model in Atlas using the screen capture feature, and you’ll instantly have a video to add to your PowerPoint presentation without needing to use any additional software.
Watch the video or follow the written instructions below to learn how to add VB content to your PowerPoint.
First, open the web version of Human Anatomy Atlas from the My Apps page in Courseware. Then, open PowerPoint and select the slide where you want to put the video clip.
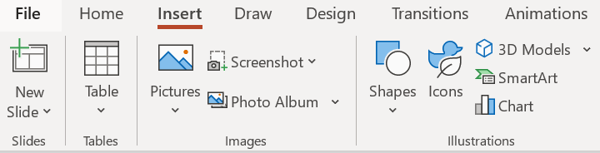
In PowerPoint, go to the Insert tab at the top of the screen. It should look something like this:
Next, click the Screen Record icon all the way at the right side of the screen.
![]()
Once you’ve done that, you’ll see a menu at the top of your screen that looks like this: 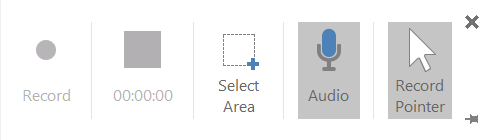
Click and drag over the area of the screen you want to record. A box bordered by a dotted red line will appear as you do. If you want to select a different area, just hit the “Select Area” button on the menu and you’ll be able to start again with your selection.
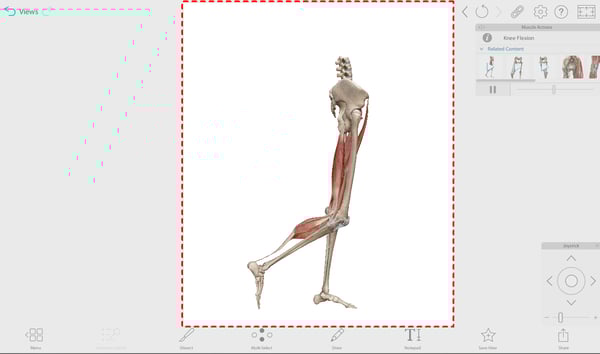 Capturing a muscle action from Human Anatomy Atlas using the screen record feature in PowerPoint.
When you’re ready to capture your video, hit “Record.” A popup from PowerPoint will give you a countdown and tell you the combination of buttons you’ll need to press to stop recording. (On a PC, it’s the Windows icon button, Shift, and Q.)
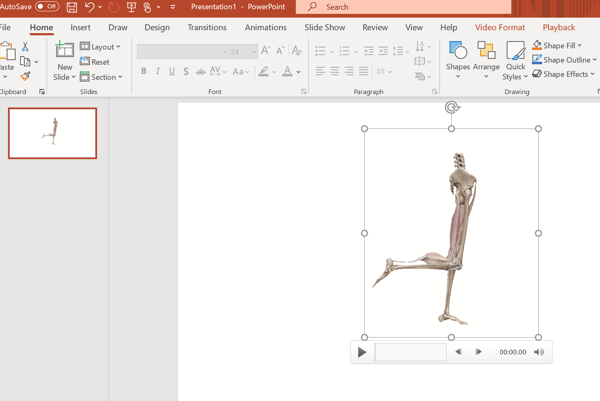
You’ll then see your video on your slide and can move it around or re-size it as you like.
For more tips on making a dynamic presentation using VB visuals, check out this video:
5. Screen sharing from your mobile device in Zoom
We’ve talked in previous blog posts and webinars about using Atlas to present Tours or explore structures during lecture sessions either online or in the classroom. Screen sharing online can be a little tricky, so we’ll focus on the online route and break down how to share your desktop or iPhone/iPad screen in a Zoom call.
If you’re using the web version of Human Anatomy Atlas on your computer, all you have to do in your Zoom call is use the Share Screen button at the bottom of the Zoom window and then select the screen you want to share in the menu that comes up. If you are not the host of the Zoom meeting, you may have to ask the host for permission to share your screen.
Let’s say you want to use your iPhone or iPad to run Atlas during a Zoom call you’re running on your computer—maybe it’s easier for you to use the 3D draw with a stylus or your finger rather than the mouse. In Zoom for Windows/Mac, you can share your iPhone or iPad screen using screen mirroring. If you have a Mac, there are two additional options for screen sharing: connecting with a cable and connecting with AirPlay.
Here’s a guide to connecting with screen mirroring, since this is the easiest option that works for both PC and Mac users.
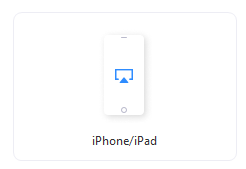
First, make sure your computer and your mobile device are connected to the same wifi network. Once that’s all set, click the Screen Share button at the bottom of the Zoom window, and then select the “iPhone/iPad” option in the menu that pops up and asks you to select a screen to share.

Then, you’ll need to go to the control center on your iPhone or iPad by swiping down from the upper right corner of the screen (where the battery level indicator is).
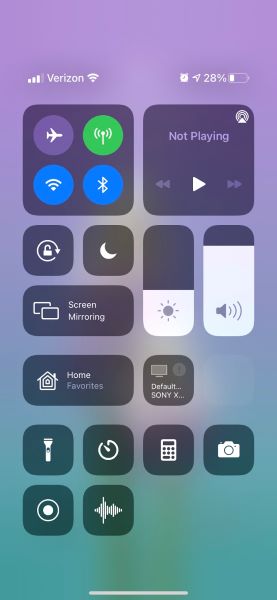
Tap the button that says “Screen Mirroring” and then select the name of your desktop computer from the dropdown menu that appears (it will likely be something like “Zoom - Your Name”). Once your screen share begins, the other people in your Zoom call will be able to follow along with what you’re doing in Atlas (or another VB app) on your phone or tablet.
Here's an additional screen sharing tip! If you want to share the audio from your source device (for example, if you're showing an animation from Atlas or A&P), click the "More" option in the Zoom menu at the top of the page while you're sharing your screen. Then select the "share audio" option from the list.
We hope you’ll find these tech tips useful! As always, our customer support and engagement teams are here to help—don’t hesitate to contact them with any questions you might have or schedule a training session. If you want to learn more about Courseware’s features and how to use them like a pro, check out the articles on the Courseware support site, as well as our collection of previous webinars and Office Hours sessions.
Happy teaching!
Be sure to subscribe to the Visible Body Blog for more anatomy awesomeness!
Are you an instructor? We have award-winning 3D products and resources for your anatomy and physiology course! Learn more here.

