How to Use Visible Body to Lecture in 3D
If you’re interested in learning how to use Human Anatomy Atlas in your lectures but aren’t sure where to start, we have just the webinar for you!
As a follow-up to his Tips for Becoming a Human Anatomy Atlas Super User webinar, Senior Director of 3D Products Chris Scalici went over how instructors can use Atlas’s 3D models in real time to create more flexible, interactive, and engaging A&P lecture sessions. He also discusses some of the advantages of using 3D models instead of a PowerPoint presentation full of 2D images.
Chris’s full tutorial is in the video below, but if you’ve only got a few minutes, we’ve also included a text summary!
Check out more Visible Body Webinars here.
Why lecture in 3D?
Before we get started with the tutorial, here are a few of the benefits to teaching with interactive 3D resources.
First of all, a 3D model can show in a single interactive visual what you’d need multiple separate pictures to show in 2D. Consider the cranial fossae view in Atlas, which shows all the cranial nerves and the foramina in the skull that they pass through. The 3D view allows you to move the model around to see the structures from different angles. This is great for teaching or learning about a topic like the cranial nerves and the foramina of the skull, where it’s useful to see the path and branches of each cranial nerve.
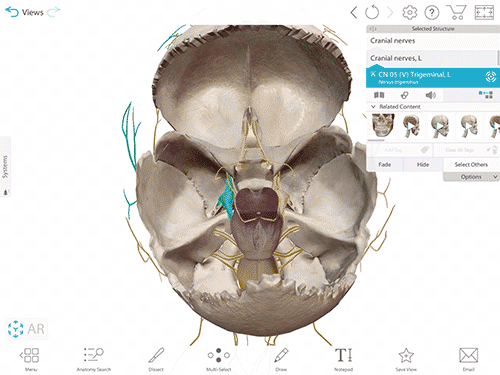
The cranial fossae view in Human Anatomy Atlas.
Interactive 3D models also make it easier to break down complex structures like the brachial plexus for closer study. Being able to select and highlight different structures and sections of structures enables students to better understand the different divisions of the brachial plexus—its trunks, divisions, cords, and the nerves that originate from it.

Using the Breadcrumb Trail to highlight divisions of the brachial plexus in Human Anatomy Atlas.
Switching between isolated and non-isolated views (either using Isolate Mode or the Hide tools) can help students see what a structure looks like on its own and in relation to the structures and systems around it.
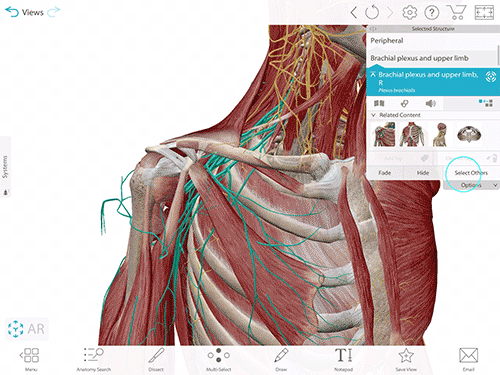
Using Select Others and Fade to isolate the brachial plexus and nerves of the right arm in Human Anatomy Atlas.
What kind of prep work is needed for a 3D lecture?
Chris began the webinar by discussing how teaching with Visible Body’s 3D content results in much less prep time before lecture sessions, and more flexible and interactive content during those sessions.
Preparing for lectures can be time-consuming. Many instructors spend hours searching for, labeling, and annotating images to put into a PowerPoint or Google Slides presentation.
With Human Anatomy Atlas, all the visuals are already in one place, and adding labels and annotations is easy with the 3D Draw, Notepad, and Tags features (no screenshots, MS Paint, or Photoshop required)!
What should you do to prepare for a lecture in 3D? If you prefer a more stream-of-consciousness style, all you really need to do is decide which view you want to use as your main hub or jumping-off point. The Quick Views in Atlas, which are based on popular textbooks and lab manuals, are a good place to start. You can also use the Content Search feature from the main menu—type in the name of the structure or system you want to cover, and you’ll get suggested views in the search results.
Finding content in Human Anatomy Atlas.
If you take a more PowerPoint/Google Slides approach to lecturing, in that you like working through a presentation slide by slide, you can use Atlas to design a Tour. Simply pick the views you want to feature in your presentation, save them as Favorites, and then create a new Tour. You can cycle between views in your Tour by using the arrows in the info box.
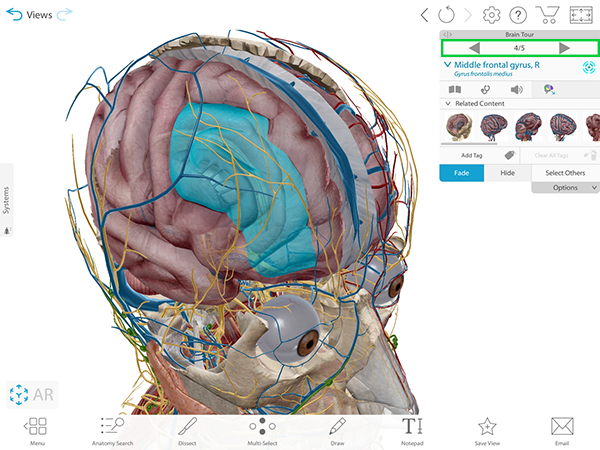
Use the arrows to move between views in a Tour. Image from Human Anatomy Atlas.
What kinds of activities can I do during lecture sessions?
The next section of the webinar blended tech tips with suggestions for in-class activities. In this summary, we’ll start with some tips for manipulating the model within a view, and then move on to some ways instructors can use the features of Atlas to create interactive activities and answer students’ questions in greater detail.
Quick tips for manipulating models and views
It’s easy to move the models around and highlight structures while you lecture in Atlas.
To highlight multiple structures at once, either use the multi-select button at the bottom of the screen or—if you’re using a browser-based, Mac, or PC version of Atlas—hold the shift key while clicking on all the structures you want to select. To center a structure on the screen, double-tap or double-click on it.
The Anatomy Search, Breadcrumb Trail, and Radius Blast tools make it easy to add related structures to your view. With Anatomy Search, you can type in the name of a structure and hit “Add” in the search results to add it to your view. If the structure you entered into search is already present in your view, you can press “Show Me” to highlight and center the view on that structure.
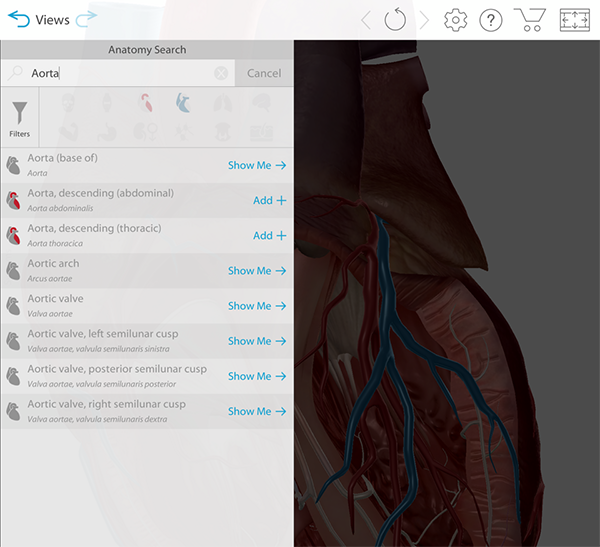
Use Anatomy Search to add or highlight a specific structure. Image from Human Anatomy Atlas.
The Breadcrumb Trail, or structure hierarchy, is available through the Info Box—click or tap the name of the highlighted structure to see its position in the hierarchy, and then click or tap entries in the hierarchy to quickly select groups of structures you want to show, hide, or fade. Similarly, the Radius Blast tool in the Info Box can be used to add structures or groups of structures near the one you have highlighted. If you have a muscle selected, for example, the Radius Blast tool might add blood vessels or nerves around it.
Want to go back to the original view you launched at the beginning of your lecture? Simply hit the “Refresh” button. You can also return to previous views using the arrow buttons in the upper left of the screen.
There are also a number of keyboard shortcuts for browser/desktop users. Check out the Atlas Super User webinar from last week’s blog post for a full list and a demonstration!
Impromptu quizzes
Human Anatomy Atlas is a great tool for in-class knowledge checks and mini-quizzes.
The simplest way to see if students know their stuff is to use the Full Screen button in the upper right-hand corner of the screen. This removes most of the buttons and menus from the view, including the Info Box. You can ask students to name structures you highlight in Full Screen mode and the Info Box won’t be there to give them the answer.
Another way to test students’ knowledge on the fly is to use blank Tags and ask students to name the corresponding structure(s). You can make Tags blank by going to Settings and clicking or tapping the Blank Tags toggle. If it’s blue, that means the Tags will be blank. From there, you can add a Tag to a highlighted structure by clicking or tapping “Add Tag” in the Info Box.
A brief overview of the Tags feature in Human Anatomy Atlas.
Once you’ve added Tags to your view, they’ll stay in place if you rotate the 3D model. You can also tap or click each Tag to highlight its associated structure.
You can also use the 3D Draw tool for quick quizzes, or for answerng student questions in detail. To start drawing, use the Annotate button at the bottom of the screen, then hit Draw and adjust the depth of your drawing. Adjusting the depth essentially means that you are selecting the plane you’re going to draw on in 3D, so consider the structures you intend to label when you’re going through this step. Once you’ve selected a depth for your drawing, you can choose between multiple tools, such as arrows, circles, rectangles, or a pen.
Chris recommended (and demonstrated) using several arrows of different colors to indicate the structures students should name (either out loud or by writing them down on a piece of paper to be handed in).
If you’re answering a student’s question, the 3D Draw tool is a great way to quickly add labels, indicate directions of movement or blood flow, and illustrate the relationships between different structures. In the video below, you can see an example of how the 3D Draw tool can be used to illustrate blood flow through the heart.
The 3D Draw feature in Human Anatomy Atlas.
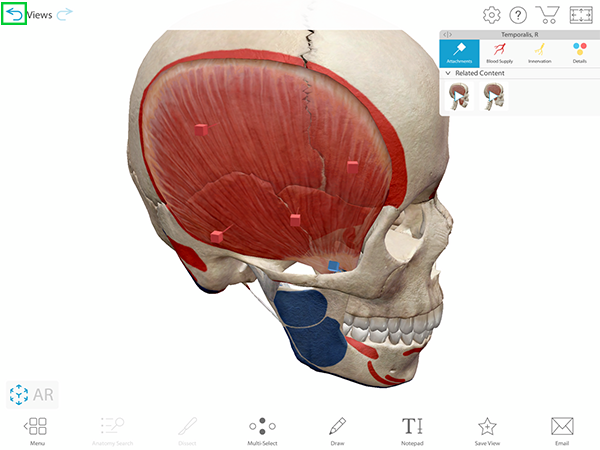
Give students detailed answers to their questions with Info Box deep dives
If you want to give students more information about a structure, the Info Box is the place to go! It shows the definition and pronunciation for the most recently highlighted structure, and it also contains information about pathologies, bony landmarks, muscle attachments, innervation, blood supply, and more.
Using the Info Box to access detailed structure information in Human Anatomy Atlas.
Different information is available depending on what type of structure is highlighted. For bones, you can open a special bony landmark or muscle attachment view using the buttons in the Info Box. You can highlight and explore the new view as you like, and return to your original view by using the “back” button in the upper left corner of the screen, as shown in the image below.
Use the “back” button to go from a special mode to your original view. Image from Human Anatomy Atlas.
If you highlight a muscle, you can use the Muscle Details button in the Info Box to open a view that shows muscle origins and insertions, innervation, and blood supply. As with bony landmarks, use the exit button to return to your original view.
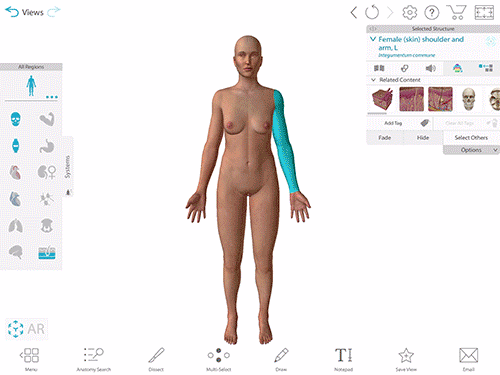
Selecting any portion of the skin will allow you to open a dermatomes view, which shows the areas of skin innervated by each spinal nerve.
Video footage from Human Anatomy Atlas.
Towards the bottom of the Info Box, you can find the Related Content section, which links to animations, microanatomy views, and/or muscle actions relevant to the structure you’ve highlighted.
Send students home with Notecards (or shared content)
Many instructors like to record lectures or post their slides for students to review when they’re studying.
If you’re using the browser-based version of Atlas that’s currently available through Courseware, you can share views and Tours with your students by using the “Share View” button. If you want to share a view that contains 3D views or notes, use the “Save Notecard” button after you’re finished annotating. You can then share a screenshot of the saved Notecard with your students via email or a direct file upload.
Creating and saving a Notecard in Human Anatomy Atlas 2020.
If you’re using Human Anatomy Atlas 2021.1, which is currently available for iOS and Android, you can save and share views and Tours that contain Tags, 3D drawings, and notes. This feature will be available soon for the Courseware version of Atlas!
Pre- and post-lecture resources
Visible Body offers numerous resources students can use to prepare for lectures or to check their knowledge afterward.
The practice dissection quizzes in Human Anatomy Atlas are great for quickly reviewing material. You can find them by clicking or tapping the Quizzes button at the top of the main menu. You can also access 3D views that correspond to our AR Lab Activity PDFs by clicking or tapping Quizzes > Lab Activities.
The Visible Body website has even more free educational resources for instructors and students. Check out our anatomy education resources page to learn more about our Lab Activities, eBooks, Anatomy Learn Site, Biology Learn Site, and Student Handouts (as well as the Blog, but you already know how to get here).
You can also check out the other webinars and Office Hours videos on our YouTube channel for more lecturing and course-creation tips!
Be sure to subscribe to the Visible Body Blog for more anatomy awesomeness!
Are you an instructor? We have award-winning 3D products and resources for your anatomy and physiology course! Learn more here.

