Using 3D Anatomy Apps During Lecture: Teaching Tips for Courseware Users
Instructors, we have great news for you: the new web and site license version of Atlas 2020 is now part of Courseware! Your students will use it to complete assignments and can download it on their mobile devices.
Don’t worry—the app’s basic functions still work the same way. We’ve also added a few features we think you’ll like! Here are some fun mini-lesson plans that show how you can use the app’s new features in the classroom to further augment your students’ learning.
Getting started
We’re guessing that if you use PowerPoint (or Keynote, Google Slides, etc.) during your lecture, you have access to a computer that projects your presentation to the class. With the web app, that means you can use VB assets in your lecture without needing to connect a mobile device!
All you have to do is open up Courseware, then click “My Apps” on the menu on the right side of the screen. Then, launch the app of your choice. (We’ll be using Human Anatomy Atlas for this blog post.)
Show muscle attachments alongside bony landmarks
It’s important for students to understand how the skeletal and muscular systems interact to move the body. A big part of grasping how these two body systems work together is to study how different muscles attach to bones. With Visible Body’s apps, this is easy to do.
You’re likely already familiar with how to view muscle attachments in a muscular system view in Atlas or Muscle Premium: select a muscle, then click the red pin icon in the content box to see its attachments, blood supply, and innervation details.
With Atlas 2020, you can now access muscle attachment details when you select a bone! Here’s an example.
Let’s say you’re teaching students about the bones of the thoracic cage. These bones just so happen to provide origins and insertions for the abdominal and intercostal muscles, and now you can work that information into a lecture seamlessly.
First, open up the thoracic cage view in the skeletal system menu. Then, click on any bone you like. For the purposes of this tutorial, I’ll pick the sternum. See that multicolored pelvis up in the content box? Give it a click and you’ll see a view of the sternum in isolation, its bony landmarks highlighted in bright colors.
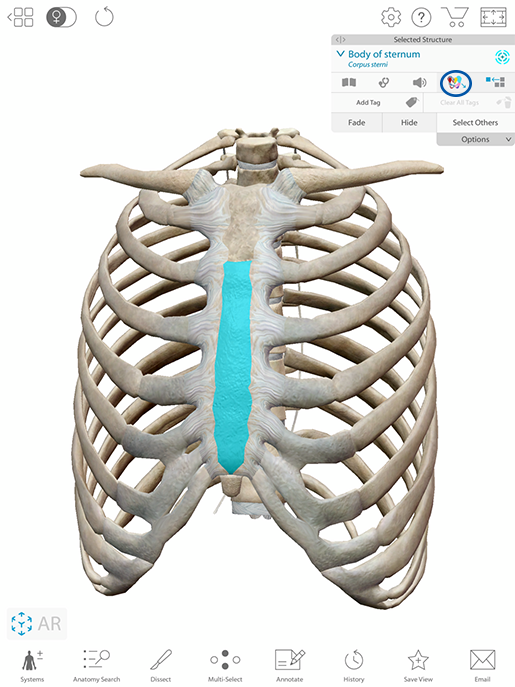 Image from Human Anatomy Atlas 2020.
In the content box of that view, click on the Muscle Attachments button, and you’ll see a view with some red pins and bone paint. Selecting the pins will tell you which muscles attach at a given location, and it will add those muscles to your view.
In the image below, you can see that I’ve clicked on the pins for the transversus thoracis (innermost intercostal) and external oblique origins. Hitting the Exit button in the content box will take you right back to the original thoracic cage skeletal system view, where you can choose another bone (maybe the manubrium or clavicle) and check out even more muscle attachments.
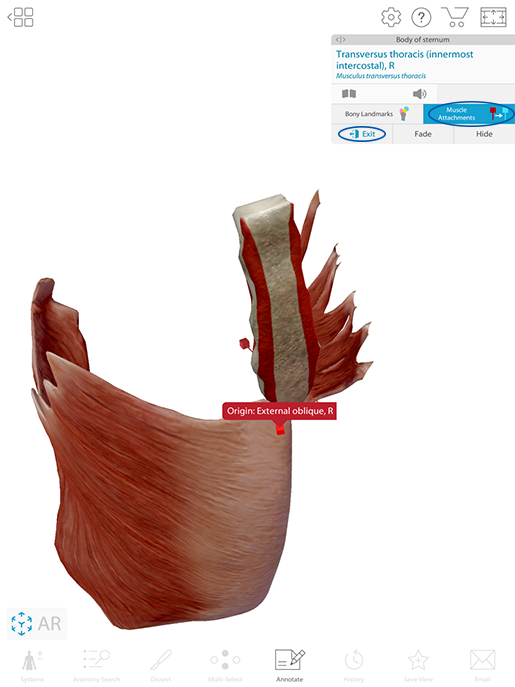 Image from Human Anatomy Atlas 2020.
Use the 3D draw feature to highlight physiological processes
The 3D draw feature makes Visible Body’s 3D models even more interactive, especially for the purposes of giving presentations. (I’ll be real with you here: of all the new features in Atlas 2020, it’s my personal favorite!) During a presentation, you can use the 3D draw tool to add annotations to Human Anatomy Atlas’ 3D models, and those annotations will remain on the model as you move it around later.
Here’s an example in which I’ll use the 3D draw feature to mark up the sectioned heart model to show the path of deoxygenated blood through the heart during the cardiac cycle. We’ll work through it step by step.
First, open up the Heart Section view (under Circulatory System Views) in Human Anatomy Atlas. Then, rotate the model so that the right atrium and ventricle, as well as the pulmonary valve, are in view.
Click Annotate > Draw at the bottom of the screen, and you’ll be prompted to set the depth of your 3D drawing. The 3D draw toolbar will then appear, and you can make your drawings on the model. Check out the video below to see this process:
Video from Human Anatomy Atlas 2020.
In the video, I used light blue to denote deoxygenated blood. I drew arrows to map out the path of this blood through the superior and inferior vena cava into the right atrium, from the right atrium to the right ventricle through the tricuspid valve, and through the right ventricle up towards the pulmonary valve.
After you’ve finished your (first) drawing, hit “Annotate” again, and you’ll be free to move the model around, including the markings you’ve made on it.
Want to add another drawing? Rotate the model (for example, you can turn the heart so the pulmonary trunk is the focus of the view) and then click Annotate > Draw again, and you can either choose to delete the first drawing you made or add another drawing, as I do in the video below.
Video from Human Anatomy Atlas 2020.
In this drawing, I added an arrow showing the flow of blood through the pulmonary trunk. Note that this arrow is on a different 3D plane than the arrows from the first drawing.
Once again, you can see all your drawings when you rotate the model, multiple 3D planes included.
Here’s the best part: you can create and show off your drawings in real time during class, making for a dynamic and engaging presentation, and then you can save your view as a notecard so you can reference it quickly later. You can also take a screenshot of it and send that around to your students.
Use the Tags feature to keep structures labeled throughout a presentation
Tags are another new feature in Human Anatomy Atlas 2020, and they’re great both in and out of the classroom.
Using tags is super easy—all you need to do is select a structure and click the “Add Tag” button in the content box, and then a label will appear on the 3D model. When you move the model around, the leader lines remain connected to that label. When you tap or click on the label, the corresponding structure is highlighted.
Say you want to show students how urine moves out of the kidney, through the ureter to the bladder, and out through the urethra. You can use tags to make a mini-tour by working through each structure and adding a tag as you go. Then, you can zoom out and return to each structure by clicking on its label, giving a quick visual overview of the path urine takes.
Watch the video below to see what this looks like:
Video from Human Anatomy Atlas 2020.
For even more interactive detail, you can try adding in some 3D drawings, too—in this case, arrows along the urine’s path.
Another fun way to use tags in lecture is to set the tags in a view to blank (Settings > Blank Tags). Then, you can check students’ knowledge by asking them the names of various structures. The answers will be revealed in the content box when you click on the tags.
Students can also use blank tags to study at home! See this post for our Atlas 2020 study tips for students.
Zoom in even further by adding new microanatomy models to tours
In general, tours are a fantastic way to use Atlas in the classroom. What’s a tour, you ask? It’s basically a combination of different views that you can easily move between. With Atlas 2020, we’ve got some great new microanatomy views you can add to your tours (most notably, the intestinal villi and the layers of the small intestine wall). To highlight them, I’m going to walk you through creating a small intestine mini-tour!
Let’s start with a view that includes the small intestines. I’ve decided to use the alimentary canal digestive system view. Hit the “Save View” button at the bottom of the screen to name and save your view! If you want to find it again later, it’ll be in your Favorites.
 Selecting and saving a view in Human Anatomy Atlas.
Next, save the small intestine cross section and intestinal villi views.
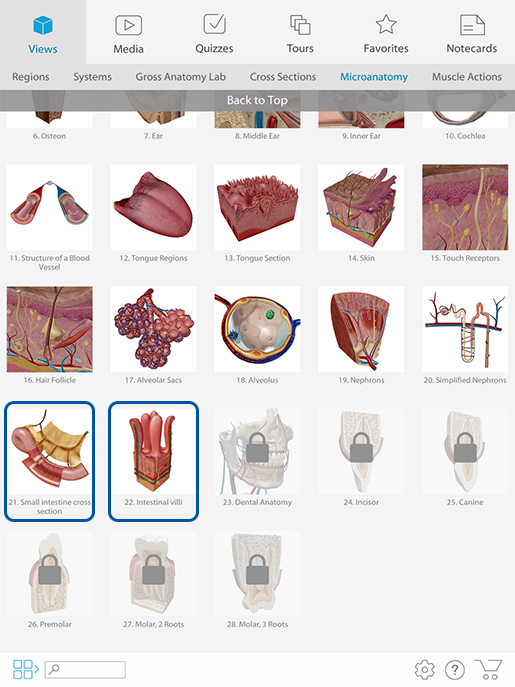 Microanatomy views in Human Anatomy Atlas.
Now you’re ready to make your tour! Go to the Tours tab and hit “Start.” Then select your three views in the order you’d like them to appear in the tour.
 Selecting views for a tour in Human Anatomy Atlas.
And voilà! You’ve got yourself a tour to use in a presentation about the small intestines! You can use the first view to talk about the general details of the small intestine, such as its different segments and its principal functions.
Then, you can zoom in a little with the second view and discuss the layers of muscle, connective tissue, and epithelial cells that compose the small intestine wall.
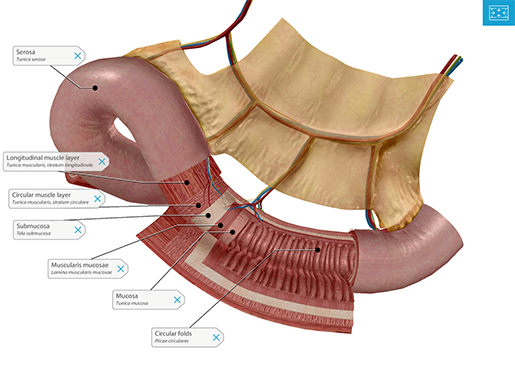 Image from Human Anatomy Atlas 2020.
The third view provides an even more micro-anatomical experience, showing the fingerlike protrusions of the intestinal villi, absorptive and goblet epithelial cells, blood vessels, glands, lacteals, and mucosa-associated lymphoid tissue. You can also see the mucosa, muscularis mucosae, and submucosa layers.
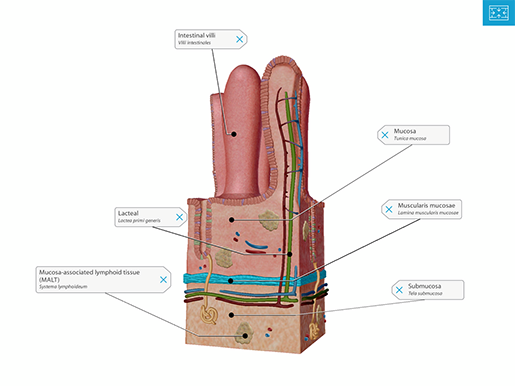 Image from Human Anatomy Atlas 2020.
For more tour-based lesson plan goodness, check out this post for a step-by-step tutorial on how to create a presentation on the urinary system.
Ultimately, we hope this post has sparked some exciting new lesson ideas, and that you enjoy using the new features we’ve added to Atlas 2020!
Want to learn more about what’s in the newest edition of Atlas? You can check out the Atlas 2020 site license release notes for a full overview of all the new features and structures we’ve added.
Be sure to subscribe to the Visible Body Blog for more anatomy awesomeness!
Are you an instructor? We have award-winning 3D products and resources for your anatomy and physiology course! Learn more here.

