


From Anatomy to Pathology: A Shoulder Region Lesson Plan in 3D and AR
Are you an instructor looking to add some interactive 3D technology to your lessons and labs? Ask for a free instructor trial of Courseware! Courseware is a web-based teaching and learning platform that can be used as a standalone LMS or integrated with Blackboard or Canvas. It features Visible Body's award-winning apps, including Human Anatomy Atlas 2022 + and Muscle Premium.
We'll be using those two programs to teach the anatomy and common pathologies of a particular joint—in this case, the shoulder region. We’re going to make use of Atlas’s 3D models, Tour and Quiz features, and AR capabilities. Muscle Premium will allow students to interact with shoulder injuries in 3D.
Ultimately, this lesson will cover…
-
The anatomy of the shoulders
-
Muscles
-
Bones
-
Connective tissue
-
Movements of the shoulders
-
Flexion
-
Extension
-
Abduction & adduction
-
Horizontal abduction & adduction
-
Medial & lateral rotation
-
Common shoulder injuries/pathologies
-
Rotator cuff (supraspinatus) tear
-
Labral (glenoid labrum) tear
-
Adhesive capsulitis (frozen shoulder)
Let’s get started!
The Muscles (Lesson & Presentation)
First, have students form groups so that they have access to a mobile device with Human Anatomy Atlas 2022 + installed. Students should follow along with you for this portion of the activity.
Before students can get into the nitty-gritty of the shoulder region, they must first learn the lay of the land (so to speak). Seeing the bones, muscles, and connective tissues of the shoulder from multiple vantage points in 3D will allow them to better understand how anatomical shape contributes to function. They will also learn important information about muscle attachments, blood supply, and innervation.
Launch the (Muscular System) Shoulder 3D view in Human Anatomy Atlas. Rotate the model to show students all of the muscles that are part of the shoulder region (it always surprises at least one student when they see the pectoralis is a shoulder muscle!).
Use the Systems Tray to add in nerves and blood vessels. Then fade the pectoralis and deltoid muscles to show how the area is innervated and supplied with blood. Explain the multiple roles the brachial plexus plays in the shoulder and upper limb. Use the Anatomy Search tool to find and add “Brachial plexus and upper limb,” then have students pan the image so they can see the full breadth of the brachial plexus and its many branches. You can take this time to explain the central role of the brachial plexus in the innervation of the shoulders and arms.
Show students the shoulder joint in detail by using the Systems Tray to remove everything but bones and connective tissue. After that, remove the glenohumeral ligaments with the Dissect tool and zoom in. This will allow you to highlight the glenoid labrum, which will become relevant when your students learn about pathologies later.
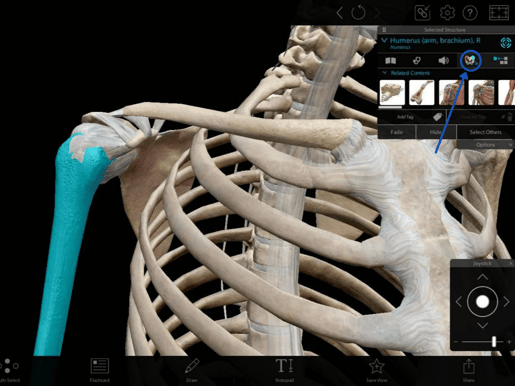
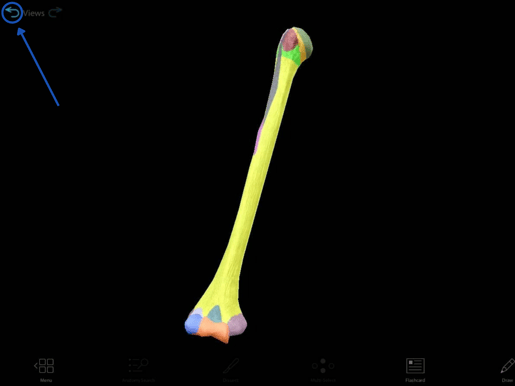
If you want to go really in-depth, you can show landmarks of the humerus and scapula (the head of the humerus and the glenoid cavity of the scapula) by highlighting a bone and tapping the icon to the right of the speaker in the Selected Structure menu. This will show a color map of the landmarks of the highlighted bone.
Press the Back arrow button at the top left to return to the original skeletal system view.
When you’re ready to focus on individual muscles, hit the refresh button (at the top of the screen next to the male/female toggle) to bring back the muscular system view you started with. Alternatively, if you want to build the muscular system view yourself, you can launch the Shoulder Girdle Skeletal System view and add the muscles in one by one using the Anatomy Search function.
Whichever method you choose, highlight each of the shoulder muscles individually as you introduce them. Then delve into a more detailed description.
Let’s use the teres minor as an example for the next few steps. Highlight it and tap the red pin icon on the Selected Structure menu.

Image from Human Anatomy Atlas 2022 +.
A new view will appear with just the highlighted muscle and the bones to which it is attached. Tap the red and blue pins to show where the muscle originates at the scapula and inserts onto the humerus. You can explore blood supply and innervation by tapping the corresponding icons. Use the “details” icon to show all relevant attachments, arteries, and nerves at the same time. Again, tap the Back button to return to your original view.
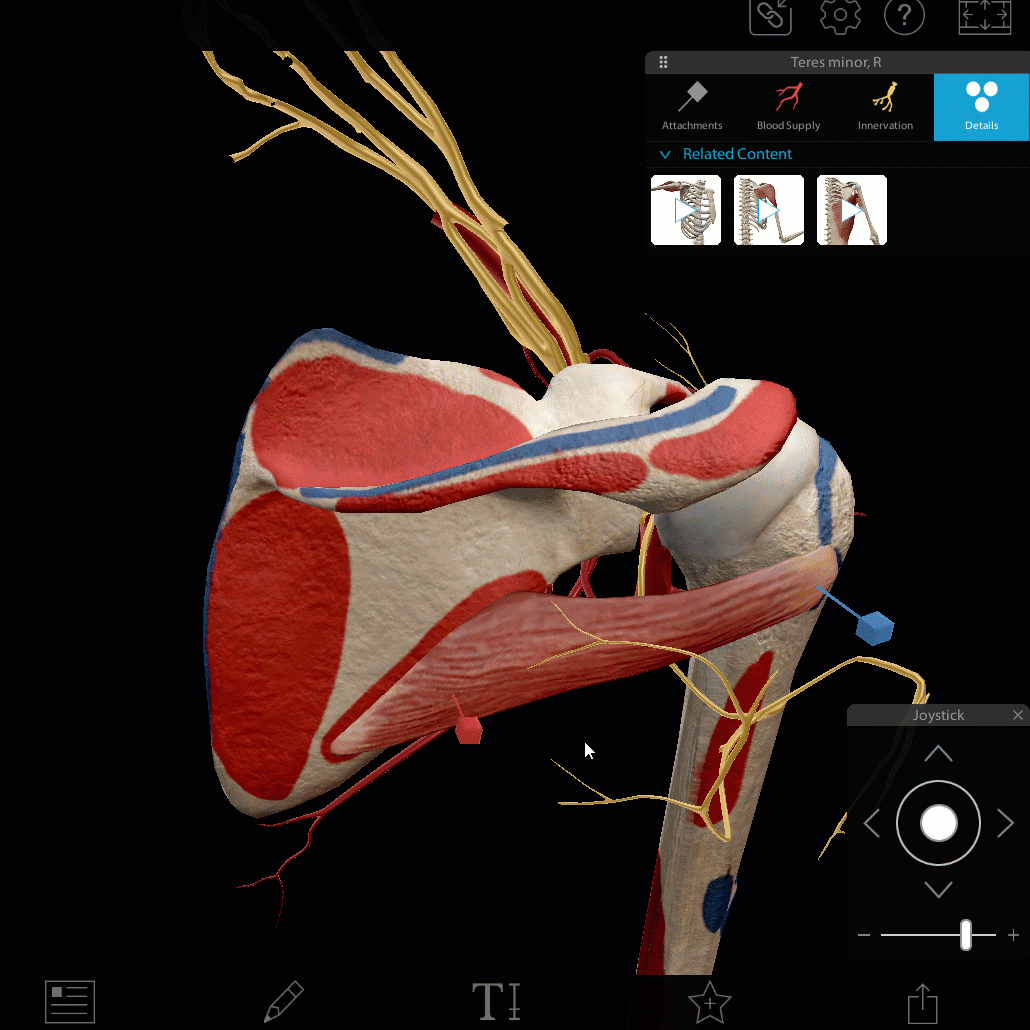
GIF from Human Anatomy Atlas 2022 +.
Here is a sample order of presentation for the shoulder muscles, starting from the rotator cuff.
-
Teres minor
-
Infraspinatus
-
Supraspinatus
-
Subscapularis
-
Coracobrachialis
-
Teres major
-
Latissimus dorsi
-
Posterior deltoid
-
Middle deltoid
-
Anterior deltoid
-
Pectoralis major
If you want to save a series of muscle views for later use, the Tour feature in Atlas has got you covered. A tour allows you to move seamlessly between views, manipulating the 3D model within each one as you go. Through Courseware, you can make your tour and video materials into an assignment/lesson and show it on a monitor or projector in your classroom. Students will also be able to access it online later.
The Movements (Group Activity 1)
Once you’ve introduced the anatomy of the shoulder, have students use their devices in groups of two or more to explore the shoulder’s movements.
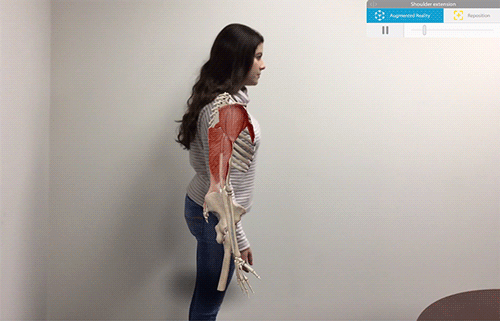
Have students launch Atlas on their devices. One student will serve as a model, performing the selected muscle action along with the 3D model, while the other students in the class view that same action in Atlas. Press the AR button in a muscle movement view in Atlas to bring the 3D image into the real world!
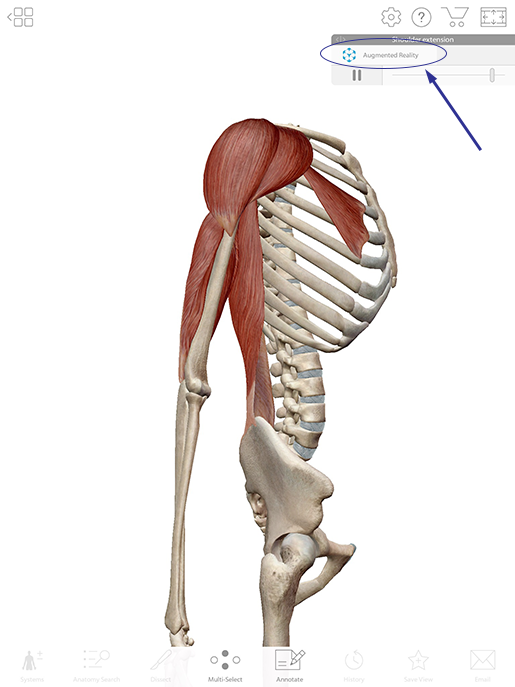
Image from Human Anatomy Atlas.
While the student-model acts in conjunction with the 3D model, have other students palpate the area on themselves to try and determine where the muscles are. Do they think they can locate the pectoralis where it inserts on the humerus? Can they feel the deltoids moving during shoulder extension?
Here are some tips for performing the muscle actions:
|
Flexion |
Raise one arm in front of you with your palm up (like you’re holding a plate). Try not to move your torso. |
|
Extension |
Lift your arm behind you like you’re preparing to roll a bowling ball. You might have to twist your torso a little, but not too much. |
|
Abduction/Adduction |
Raise your arm(s) to the side in a T-shape and lower them. |
|
Horizontal abduction/adduction |
Hold both hands out in front of you, elbows soft. Pretend you have a beach ball in your hands. When it inflates, draw your hands apart. When it deflates, bring your hands back toward each other. |
|
Medial & Lateral Rotation |
Bend your elbow in toward your torso and hold your hand and forearm out flat in front of you like you’re holding a tray. Move the “tray” towards (medially) or away (laterally) from the midline of your body, trying to move your upper arm (above the elbow) as little as possible. |
While observing a muscle motion in AR, students can fade/hide different muscles to see what different groups do. For example, if they fade the deltoids, they can see how the rotator cuff muscles move. If they fade all the muscles, they can see exactly what the joint is doing.
Video/AR from Human Anatomy Atlas.
Ultimately, an AR overlay for a muscle action should look something like the shoulder extension example below. Have students rotate the 3D model to see it from a lateral view. Then, change the size and position of the 3D model (using the zoom and move gestures) so it lines up with the student-model.
Video/AR from Human Anatomy Atlas.
Knowledge Check! (Quiz)
Time for a quiz! Don’t panic—we’ve already got a whole bunch of pre-made dissection quizzes in Atlas (and Muscle Premium). All your students have to do to check their knowledge is go to the Quizzes screen in either app and select the Shoulder Joint quiz.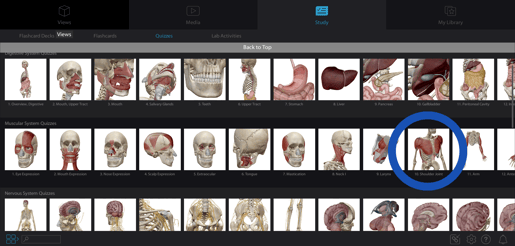
Image from Human Anatomy Atlas 2022 +.
If you’re feeling generous, give students a few minutes to explore/review the muscles in the shoulder view first. Then have them complete the shoulder muscles quiz to check their knowledge. They can do this either individually or in groups.
Pathologies (Group Activity 2)
Now that your students know the shoulder’s components and how they work together, it’s time for a group project to look at what happens when the shoulder becomes injured.
Have your students work in groups again, this time launching Muscle Premium on their computers. Assign each group one of the following shoulder pathologies: rotator cuff (supraspinatus) tear, labral (glenoid labrum) tear, or adhesive capsulitis (frozen shoulder).
As students manipulate the models and explore pathologies and individual muscles in Muscle Premium, their ultimate goal will be to write down certain facts about their assigned pathology and later present them to the rest of the class.
-
Describe the injury:
-
Which structures are involved?
-
How do they become injured?
-
What kinds of muscle actions are the injured structures involved with?
-
Which muscle motions will become difficult as a result of this injury?
You can compile these presentations into a study sheet students can use later by having each group put their answers in a spreadsheet (like a Google Doc) as they work. Alternately, you can have one person in the class be the designated scribe and write everything down in a document you can all share later (they can send it to you so you can post it on Courseware or your institution’s LMS).
And there you go—an all-in-one lesson about the shoulders, from anatomy to pathology.
We hope you and your students enjoy this interactive 3D/AR experience!
- Learn more about how and why students use 3D anatomy apps in their studies.
- Interested in using virtual 3D anatomy models and animations to teach about the human body? Check out Visible Body Courseware!
- Sign up to get our awesome emails and be the first to know about free anatomy content, new blog posts and eBooks, secret sales, and more!
