Free Lesson Plan: Learning the Liver
Today on the Visible Body Blog, we’ll walk through a lesson plan centered around the liver! This lesson uses collaboration and the 3D tools in Visible Body Suite.
Feel free to adapt elements of this lesson plan or break it up over multiple days to better suit your class duration and your students’ level.
Let’s dive in!
Tour the liver in 3D
Start off by using the Tours feature to lecture in 3D! A Tour is like a custom slideshow of 3D model content. Simply access the models you would like to use and save the views as favorites, then create a Tour using these views.
Here are some ideas for Views to add to your liver overview Tour.
Let’s first start off with the big picture. Show students the position of the liver, pointing out its position inferior to the diaphragm and how it stretches from the right upper abdomen across the mid abdomen and into the left upper abdomen.
Next, focus on the anatomy of the liver itself. Examine the structures that will provide reference for the lobes and segments, pointing out how the liver connects to the abdominal wall and the diaphragm through several peritoneal ligaments: the ligamentum teres hepatitis, two lateral ligaments, the coronary ligament, and the falciform ligament.
Point out the hepatic artery and the hepatic portal vein, explaining how the hepatic artery delivers oxygenated blood from the heart to the liver, and the hepatic portal vein delivers partially deoxygenated blood that contains nutrients from the small intestine.
Next, look at the segments of the liver, highlighting each one. Describe their boundaries and how each segment has its own vascular inflow and outflow and biliary drainage.
Now that students have a good overview of the gross anatomy at hand, let’s dive deeper and look at the functional unit of the liver: the lobule.
Using the hepatic lobule microanatomy model, show students how hepatocytes collect in a hexagonal shape around a central vein and how grooves in the cell membranes form bile canaliculi, small ducts from which bile flows.
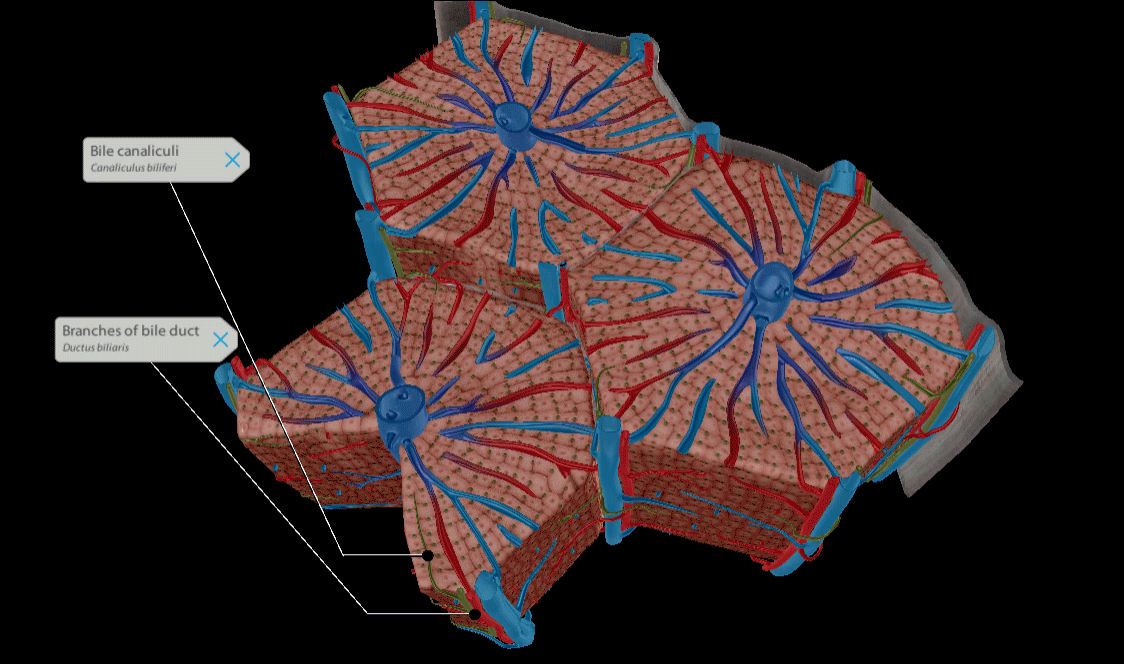
Hepatic lobule model in Visible Body Suite.
Explain how these canaliculi merge to form the right and left hepatic ducts, which merge to form the common hepatic duct. The common hepatic duct exits the liver and joins the gallbladder’s cystic duct to form the common bile duct, which flows into the small intestine.
After this lecture, students will have an understanding of the liver’s anatomy, from the lobule to the liver’s position in the body!
Review and create
Now that students understand liver anatomy, it’s time to review the information. Let’s review through a quiz and through the creation of study materials.
After your lecture, ask students to review with the quick, premade liver quiz in VB Suite. Have your students navigate to the Study tab and select Quizzes. The liver quiz is in the second row—select it. Students will be quizzed on their knowledge of the ligaments and lobes.
.png?width=515&name=My%20project%20(1).png)
Quizzing in Visible Body Suite.
Want something more customized than a premade quiz? You can create your own multiple choice and dissection quizzes using Courseware! Check out this article or this deep-dive webinar that walks you through all of Courseware’s quizzing features, including how to make or modify questions.
Next, have your students create their own study tools using Flashcards. Students can manipulate the 3D models and then select the “Flashcard” button on the bottom toolbar. There, they can reposition the model, take a snapshot, and then add labels, drawings, or text to create both sides of the card.
Ask students to write out their own prompts on the first side of the Flashcard, covering the structures they learned about in the lecture.
Once two or more Flashcards are made, they can be collected into a deck. Have your students trade decks with a partner using the sharing function to get peer feedback. Students should check each other’s work for accuracy, clarity, and missing details. Not only is this peer review process beneficial for the student whose work is being reviewed, but during the review process, the reviewer assesses and reinforces their own knowledge.
Creatively connect ideas
Credit where credit is due: this activity is inspired by a webinar Dr. Cindy Harley delivered on alternative forms of assessment in the A&P classroom. If you haven’t already, check it out or read the recap blog post!
In this activity, students will create and present sketch notes, a method of note-taking that—you guessed it—primarily incorporates sketches, arrows, and other visual elements. Instead of text, your students will synthesize information through drawing.
Sketch notes made by Dr. Harley's students. Images from the "Smart Assessments: Moving Beyond Exams" webinar.
For this activity, you will need:
- A Sticky Easel Pad or poster-sized paper and tape
- The classroom’s whiteboard
- Markers and dry erase markers
Divide students up into groups and assign each group a category of liver function, like the categories this article uses:
- Bile production
- Fat-soluble vitamin storage/metabolism
- Drug metabolism
- Bilirubin metabolism
- Other functions
Of course, you are more than welcome to use your own or assign categories based on your textbook.
Each group then works together to research their category and create a page of sketch notes using the paper and markers. Most of the class time dedicated to this activity should be used in this collaboration stage.
When everyone is done, each group will tape their notes to the whiteboard, leaving room between pieces of paper to connect ideas even further. In a short presentation, each group will explain the liver functions they have covered and walk the class through their notes.
When all groups are finished, discuss as a class how the ideas can be tied together further. Using dry erase markers on the whiteboard, you will add to the sketch notes by drawing these connections, creating one big sketch note that ties together the groups’ pages.
Are you running a virtual class but you’re still interested in sketch notes? No problem! Students can annotate models from VB Suite using the drawing, text, and shape tools and can download their images by clicking “Share” on the toolbar and selecting “Download Image.” Students can then use a free program like Google Jamboard to upload their images and collaborate with their groups.
Want more?
Here are some resources to give you ideas on how to use Visible Body in your A&P classroom.
- Explore our robust library of lab manuals and activities
- Want to incorporate tablets and other mobile devices into your class? Check out these augmented reality lab worksheets
- Browse more lesson plans on the blog:
Are you looking for more ways to teach using Visible Body? Check out our webinars! Attending a webinar is a great way to hone your skills and connect with other instructors. You can view recordings of past webinars here.
Be sure to subscribe to the Visible Body Blog for more anatomy awesomeness!
Are you an instructor? We have award-winning 3D products and resources for your anatomy and physiology course! Learn more here.

