

Free Lesson Plan: Anatomical Planes, Positions, and Directional Terms
For students, the beginning of an A&P course can feel like wading through a sea of confusing new terminology. Who knew there were so many ways to describe where things are located in the body, or how the body is positioned, or what plane a cross-section is on?

If you’re looking for a way to help your students navigate these concepts, Visible Body is here to help! 3D visualization of human anatomy is our specialty, after all.
Check out our video on planes, positions, and directional terms!
Here are some short class (or homework) activities in Visible Body Courseware that your students can do to explore anatomical planes, positions, and directional terms!
Get immersive
Assignments in Courseware are made up of bite-sized activities and quizzes that walk students through life sciences content with interactive models and animations in a focused, "on the rails" experience.
Courseware assignments are easily edited and customized to your course, and Courseware’s assignment builder allows you to create your own from scratch!
Our team has got you covered with a premade assignment on anatomical terminology.

An immersive assignment in Courseware.
Students can manipulate and explore the 3D model under the guidance of the instructions on the lefthand side.
When a structure is selected, the info box pops up, providing the opportunity to…
- Add a tag
- Fade or hide
- Read a definition
- Read about related pathologies
- Hear a pronunciation of the structure’s name
- View attachments and insertions, blood supply, innervation, and other details (if the selected structure is a muscle)
When a student has completed the activity, they can click the Next button to bring them to the next one. multiple choice and structure identification quizzes check students’ knowledge as they make their way through the assignment. These quizzes are automatically graded, and grades are logged into the Gradebook.
Use Gross Anatomy Lab (GAL) views to distinguish between prone and supine positions
One of the principal distinctions students need to understand is the difference between prone and supine anatomical positions. In this class activity, students will use the Gross Anatomy Lab views in VB Suite to explore the differences in dissecting models in prone and supine positions.
First, have students select the first GAL view (Back) in VB Suite. If there is space in the lab or classroom for them to do so, they can interact with the 3D model in AR mode.
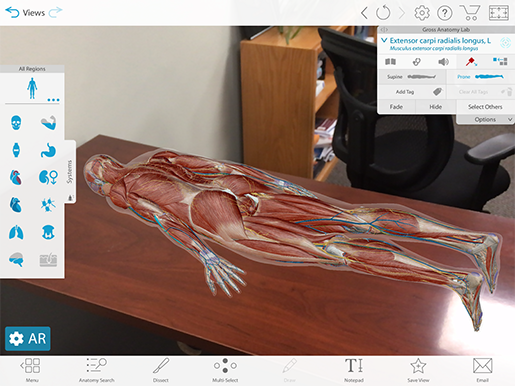 Image from Visible Body Suite.
Students should explore this view, dissecting away layers of skin and muscle to see which internal structures are easiest to access with the model in the prone position. They can switch between a male and a female model via the settings button.
When they’re finished examining the model in the prone position, they should hit the refresh button at the top of the screen to bring back all the structures they dissected away. Then, they should use the “supine” button in the info box to flip the model over.
From there, they can explore the male and female models in supine position.
Have students discuss with a partner why it might be important for certain medical and imaging procedures to position the patient in either a prone or supine orientation.
Use the 3D Draw tool to illustrate directional terms and planes of section
When you were in school, did you always secretly want to draw in your textbooks? Did you take notes in multiple colors, or get yelled at for doodling in your notebook? Well, the 3D Draw feature in VB Suite is a dream come true for students who yearn to take a digital paintbrush to their class materials.
In these two mini-activities, students will use the 3D draw tool to create saved views illustrating directional term pairs and planes of section.
1. Directional Terms
Have students go through each of the following pairs of directional terms:
- Superior/inferior
- Dorsal/ventral
- Lateral/medial
- Distal/proximal
- Superficial/deep
For each pair, students will select a view to illustrate the contrast. I’ll use distal/proximal as an example.
First, select a view: in this case, the Axilla view from the Regional views will do nicely. Then, zoom and position the model and select the Draw tool from the menu at the bottom of the screen.
Here’s how I illustrated the distal/proximal distinction. After adjusting the depth of the drawing, I added a double-headed arrow stretching from the hand to the shoulder. You can move the model and add more drawings as you go—I added “distal” near the hand and “proximal” near the shoulder to complete my view.
 The finished product of my distal/proximal notecard. Image made with VB Suite.
Students can save their views using the Save View button at the bottom of the screen. Then, they can compare the views and illustration method(s) they chose with those of a partner or members of a small group. They can even assemble their views into a Tour (a 3D presentation) to study from later!
Note: students can feel free to get creative with the views they choose. Regions, systems, GAL, cross-sections—anything goes as long as it clearly demonstrates a contrast appropriately!
2. Planes of section
For this activity, have students open up the skull model in VB Suite. Then, they can either work alone or as a group to illustrate the following anatomical planes using the skull:
- Frontal (coronal)
- Sagittal
- Transverse
You can walk them through your preferred method of illustration using the frontal/coronal plane. Personally, I’ve found that the easiest way to do this is by using squares in the Draw tool, so feel free to use these instructions.
Make sure the skull is facing front and isn’t tilted up, down, or to either side. Also make sure there’s a little bit of space around the outside of the skull. Select the Draw tool and adjust the depth of the drawing by moving the blue area over part of the model.
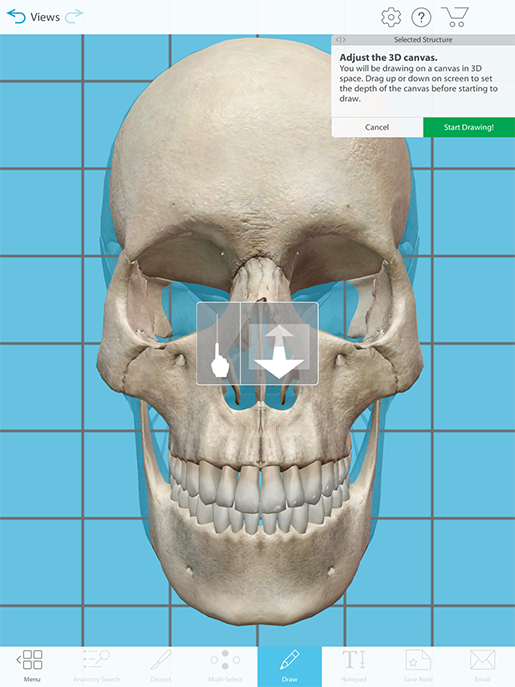 Image from VB Suite.
Then, start your drawing. Choose the rectangle tool in the Draw box at the top right of the screen. Click/tap and drag to create a rectangle that surrounds the skull, like so:
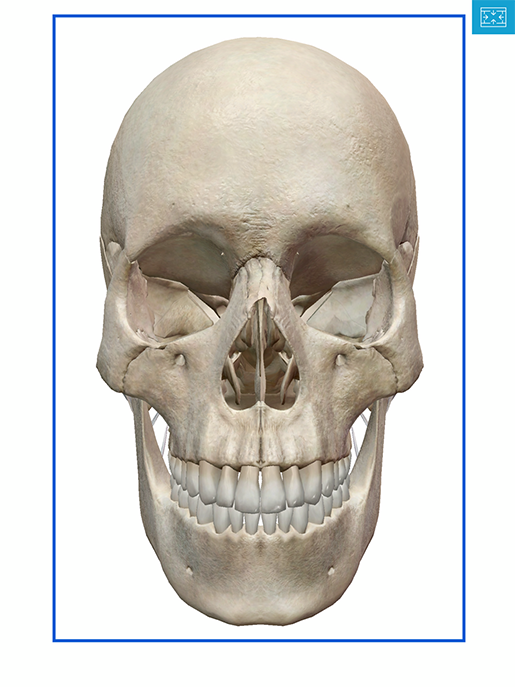 Image from VB Suite.
Rotate the model to check out your coronal section!
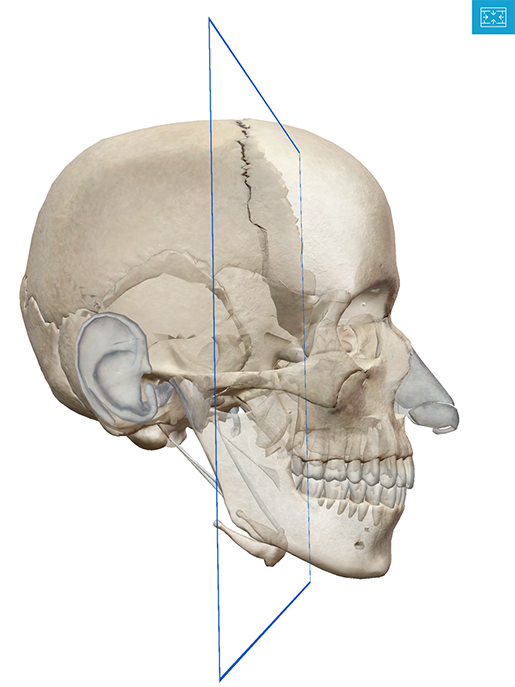 Image from VB Suite.
Have students rotate the model and add similar drawings to illustrate transverse and sagittal sections.
Flashcards
When it comes to memorization, flashcards are a tried-and-true study tool. VB Suite's Flashcards incorporate 3D and mobile learning for a great study experience!
 Flashcards in VB Suite.
Students and instructors can use the Anatomical Terminology Deck from Visible Body's bank of premade Flashcard Decks, or they can create their own with a few easy clicks—simply click on the Flashcard button on the bottom toolbar, adjust the model, add annotations and labels to the front and back, and save!
Flashcards are an excellent tool for learning on the go with the VB Suite mobile app! Once synced, they can even be used without wifi or cell reception.
Use cross-section views to explore slices across different planes
To look at what different slices (coronal, sagittal, and axial) look like as 3D models, MRI or CT scan images, and photos of real cadavers, have students explore the Cross Sections series of views in VB Suite. To view all cross sections, click on Human Anatomy on the main menu and then select the filter icon on the upper right. Toggle "Cross Sections" on, and voila!
 Cross sections in VB Suite.
Encourage students to tap or click around to see which parts of which organs are visible in the different cross sections. The MRI, CT, and cadaver images also have labels they can click on to identify various structures.
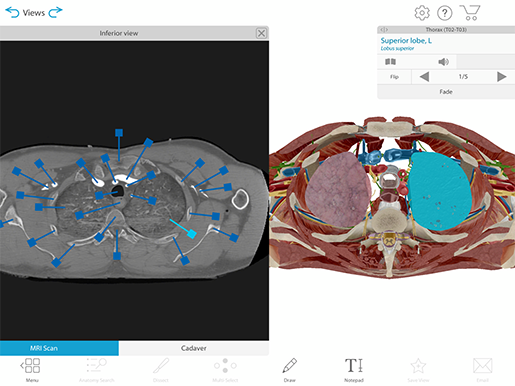 A cross-section view of the torso from VB Suite.
Once students have had time to familiarize themselves with the 3D models and medical images of the slices, you can test their knowledge using pickles. Yes, pickles! You can also use cucumbers, zucchinis, summer squash, or any other oblong fruit or vegetable.
The following activity is adapted from the open source A&P I lab manual from the University of Georgia.
Each student will need:
- A pickle on a plate
- A knife
- 4 toothpicks
Students should poke the toothpicks into the pickle to represent the arms and legs (they will serve as markers to differentiate the sagittal and coronal slices). Then, have students count off to divide the class into at least 3 groups. If you want to incorporate parasagittal and oblique slices into your lesson, you can add two additional groups.
Each group will be assigned to slice their pickle along a different plane:
- Group 1 → Sagittal (Midsagittal/Median)
- Group 2 → Coronal (Frontal)
- Group 3 → Axial (Transverse/Horizontal)
- Group 4 (optional) → Parasagittal
- Group 5 (optional) → Oblique
Once students have sliced their pickles, they should compare their slice with others in their group and contrast it with others outside their group. Students should take photos or draw representations of one of each type of slice.
We hope you and your students enjoy these activities! For more fun with planes and positions, check out these other VB blog posts:
- Using Visible Body to Master Terminology & Vocabulary
- Anatomy and Physiology: Anatomical Planes and Cavities
- Anatomy and Physiology: Anatomical Position and Directional Terms
If you want to learn more about using 3D anatomy technology in your classroom, visit our instructors page and our education resources page.
But wait, there’s more! You can also download our free Planes & Positions eBook for a quick reference tool you can share with your students:

Be sure to subscribe to the Visible Body Blog for more anatomy awesomeness!
Are you an instructor? We have award-winning 3D products and resources for your anatomy and physiology course! Learn more here
