Forensic Science Lesson Plan Part I: Directional Terms with Visible Body
Part of the reason forensic science is a great subject is that it incorporates so many different disciplines. By accurately describing the body, students will learn vocabulary used in medical contexts, and it will allow them to think more critically about human anatomy.
This is the first part of a two-part lesson plan designed for a high school forensic science class. In this lesson, we are going to use a fictional case study and the resources in Visible Body Courseware to learn about anatomical directional terms.
In this lesson, you’ll find:
- A fictional crime narrative
- A premade Tour that uses 3D models to illustrate concepts
- A premade Flashcard Deck to review vocabulary
- A short assignment to check what students have learned
Students will develop vocabulary to talk about human anatomy. By the end of this lesson, students will be able to describe anatomy using the following terms:
- Superior and inferior
- Dorsal and ventral
- Lateral and medial
- Distal and proximal
- Superficial and deep
In part two of this lesson, students will apply this vocabulary as they learn about autopsies and about the end of the case.
How to use this lesson plan
This lesson uses several features in Visible Body Courseware: Tours, Flashcards, and a quiz assignment. All relevant content is already loaded into Courseware and ready to go!
If you don’t have access to Courseware yet, reach out to our team for a free instructor trial!
If you already have Courseware, follow these steps to add this folder to your course in Courseware:
- Click on this link to add the lesson plan material to your Courseware account
- In this new course, click on the Bulk Editing tool, select the relevant folder(s) and click Copy. Choose the destination course and folder and copy.
- Navigate to your existing course, where you will find the content you copied. Use the bulk editing tool to edit release and due dates and publish. If you have Canvas deep integration set up, deploy to Canvas.
Once this lesson content is copied to your account, you can customize it to fit your class’s unique needs!
Here is a link to the text of part I of the case study. This PDF and the text can also be found in the folder in Courseware.
1. Introduce the case study
This narrative is designed for discussion, getting students talking, asking questions, and putting their investigative skills to work while learning about anatomy and autopsies. It pertains to the deaths of the fictional Paul Ossis and Brenda Ossis-Grant, 32-year-old fraternal twins who co-own a jewelry store in a small rural town. In part I, students will learn about the background of the case and the events of Wednesday, July 8th, where Paul is missing and Brenda has been found dead.
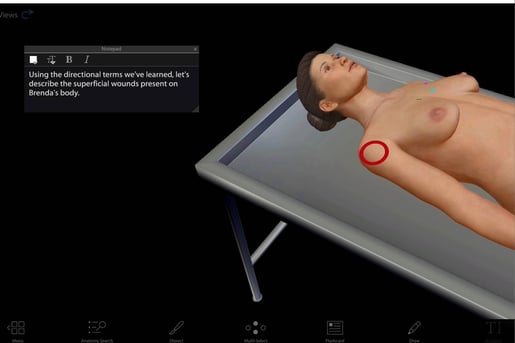
Image of Tour. You can assign Tours in Visible Body Courseware!
The text will take about three and a half minutes to read aloud. We suggest that your class reads it aloud “popcorn style.”
After students have read part I of the case study, pause for discussion. Write down your students’ questions and ideas where the whole class can see them, like on a whiteboard. Eventually, students will bring up examining the body of Brenda Ossis-Grant, and you can use that as a transition into the next section.
2. Learn positions and directional terms with a Tour
Before we look at the body, let’s take a step back and talk about the skill we are going to apply today: directional terms!
The Tour created for this lesson is split into two parts: lecture and examination.
Tour views 1-11 are lecture aids! These views walk students through basic anatomical directional terms: medial, lateral, superficial, deep, proximal, distal, anterior, posterior, superior, and inferior. These terms are grouped into pairs, and between each pair there are practice questions that the class can answer together.
GIF of a Tour made with Visible Body Suite. You can assign Tours in Visible Body Courseware!
After slide 11, take a short break for discussion. Ask students:
- What contexts are these terms used in?
- Why is it important that we have specific terms for directions in relation to the body?
Next, Tour views 12-16 examine the superficial damage to Brenda’s body, with special attention paid towards directional terms.
These views include brief overviews of bruises and gunshot wounds. If your students have already learned about contusions or ballistics, you can go into a more in-depth conversation about what investigators would look for in regards to the age of the bruise or determining distance of fire.
3. Review with a Flashcard Deck
After the Tour is complete, review with your students what they’ve learned about directional terms and about the case. As a class, make a list of 5+ questions students have about the case.
In Courseware, you’ll find a link to a custom Flashcard Deck that reviews the ten terms students have learned today. This Deck can be used to finish up the lesson or review information at the start of the next class.
You can assign Flashcard Decks in Visible Body Courseware!
4. Directional terms assignment
Students can then complete a short, five-question quiz to check their understanding. This quiz can be assigned as homework or can be completed in class depending on the needs of your students and the time left in class.
Since this is a multiple choice assignment, Courseware will automatically grade it for you! 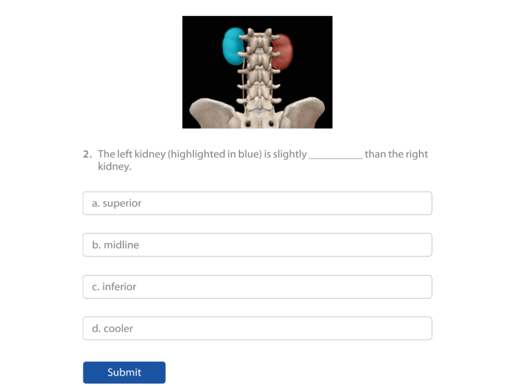
Multiple choice quiz in Visible Body Courseware.
What’s next?
In the second part of this two-part lesson, students will learn about autopsies, the death of Paul Ossis, and exactly what happened that fateful Wednesday afternoon!
Sources
Here are the sources used to develop this content.
- Anatomy and Physiology: Anatomical Position and Directional Terms
- Interpreting bruises at necropsy
- Gunshot Wounds Forensic Pathology - Continuing Education Activity
Be sure to subscribe to the Visible Body Blog for more anatomy awesomeness!
Are you an instructor? We have award-winning 3D products and resources for your anatomy and physiology course! Learn more here.

