How to Create A&P Lesson Videos with Human Anatomy Atlas
When bringing courses online, instructors are always looking for ways they can keep students engaged. In a recent Visible Body Office Hours session, Professor Cindy Harley mentioned that she likes to incorporate short videos into the courses she creates in Visible Body Courseware. She finds that short videos are a good way to break down a longer lecture into smaller, more digestible pieces. There are also a lot of opportunities for instructors to be creative and let their personalities shine through!
If you’ve ever wondered how you can create shareable videos using Visible Body’s 3D content, have we got a tutorial for you! Today, we’re going to show you how you can make your very own videos using Visible Body’s Human Anatomy Atlas app. Whether you’re an instructor, a student, or a medical provider, you can use these basic instructions as a foundation for making engaging 3D content you can share with your students, colleagues, classmates, and patients.
Here's a brief example of the kind of video you'll be learning how to make:
For this tutorial, we will be using the iPad version of Human Anatomy Atlas. We’ll also provide a brief explanation of various screen-capture techniques you can use for other mobile and desktop devices.
What you'll need:
- A mobile device (iPhone, iPad, Android phone or tablet) or desktop computer (running MacOS or Windows)
- A cable to connect your mobile device to your desktop computer. You can also use iCloud or AirDrop if you’re working with iOS/MacOS devices, or Google Drive if you’re working with an iOS or Android mobile device and computer running Windows or MacOS.
- Visible Body’s Human Anatomy Atlas (mobile app or web version)
- A script that walks listeners through your lesson (optional, but recommended!)
1. Start with a script
Here at VB, that’s how we start when we make our videos using app content. We usually use a table — the text we read for the voiceover will be in one column and the visuals we want to use will be in the other. This helps us get an idea of the views we’ll need to use when we open up Atlas, and how we might want to manipulate those views while we’re doing the voiceover. If you want to be a bit more stream of consciousness and use the voiceover column to just list some key points you want to remember to talk about, that’s fine too!
Pro tip! When you’re writing a script, it helps to keep things short and sweet. Focus on the main points you want to make and the visuals you will use to make them.
Here’s an example of what the beginning of a script for a video about the kidneys might look like:
|
Voiceover |
Visuals/Views |
|
Today, we’re going to talk about everyone’s favorite waste-secreting urinary system organs: the kidneys! |
Regional views -> 7. Kidneys (F) |
|
As you can see, the kidneys are located on the back wall of the abdomen, on either side of the vertebral column. The right kidney is usually a bit lower than the left one. |
Zoom out and rotate model to show the location of the kidneys relative to ribs and spine. |
|
The renal capsule is the innermost layer of tissue surrounding the kidney. It protects the kidney from infection and helps keep its shape. Let’s dissect it away to take a look at the renal cortex. |
Highlight kidney, zoom in, dissect away renal capsule and front half of the renal cortex. |
2. Create your views and save them as Favorites
Think about the views you want to use in your video. Let’s keep going with the kidney example. Maybe you want to start with a broad overview of the kidneys’ location, then talk about their blood supply, then go over their internal structure, and then zoom in even further to talk about blood filtering and urine formation at the nephron level.
Atlas has many regional and microanatomy preset views you can use. Simply tap or click on the view you want to start with from the Views menu, and you’ll be able to customize the view to your heart’s content before saving it as a favorite (which you can do by hitting the “Save View” button at the bottom of the screen). Here are some tips from the VB Support Site for customizing a view.
In the newest version of Atlas, you can use the 3D Draw tool to add notes to a view. In this example, maybe you’d want to draw the path of urine from the renal pyramids to the renal pelvis and out through the ureter, like I did for this view.
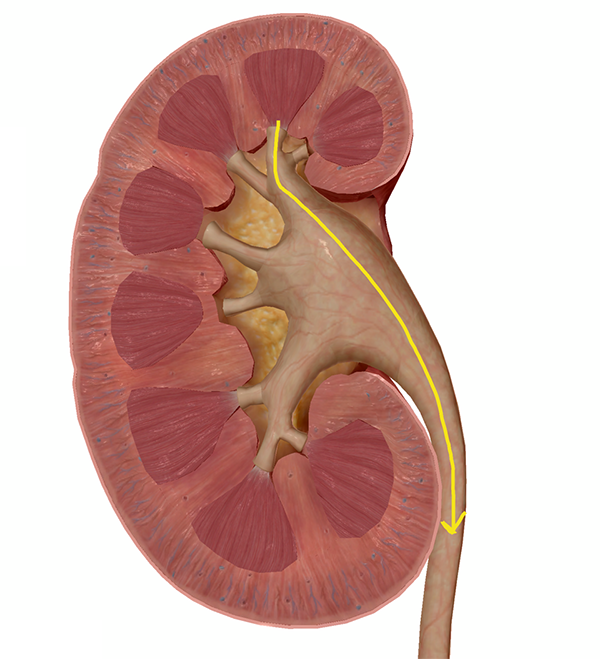
Using the 3D Draw tool in Human Anatomy Atlas to illustrate the path of urine.
3. Make a Tour
An easy way to connect all your custom views is to put them together into a Tour—that is, a presentation made up of several linked Favorited views. That way, you can move between your visuals easily when you’re reading from your script.
To create a tour in Atlas, simply tap or click the “Tours” button at the top of the main screen, and then hit the blue “Start” button to choose the views you want to include. Once you’ve decided on your views and the order you’d like them to be presented in, hit Save and name your Tour. You’ll then be able to access your newly-made Tour from the Tours menu.
4. Record audio and video
One of the nice things about using an iOS device to record is that you can record your screen and your audio at the same time.
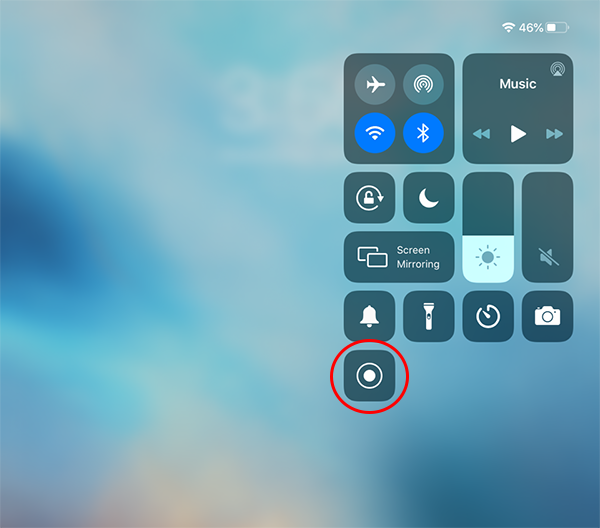
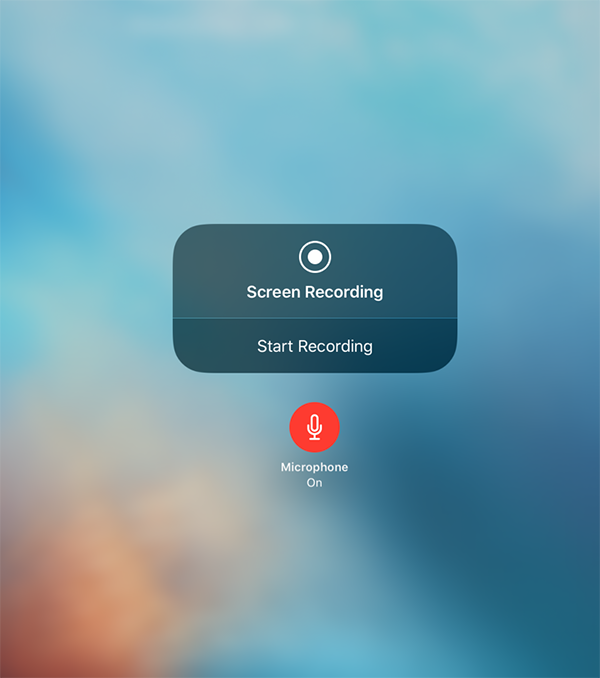
Before you record your screen, it’s helpful to queue up your Tour or have the first of your visuals ready to go. Then, you can start recording (on iOS) by swiping down from the upper right corner of the screen, then pressing and holding the screen record button. You will then have the option to turn your microphone on and begin recording the contents of your video.
Once you’re done recording your video, swipe down from the upper right corner of the screen and touch the screen record button a second time. Your video will then be available in your device’s photos.
Not using an iOS device? Here are some screen recording techniques for other popular devices!
- MacOS: Shift-Command-5 or QuickTime
- Windows 10: XBox Game Bar
- Android mobile device: Android 10 or 3rd party apps
By the way, if you’re not into recording your audio and video at the same time, you don't have to do so. Personally, I find that when I’m working with a particularly detailed script and set of visuals, I like to record my audio first and then listen to it as I record the video. You can combine audio and video using a video editing program (for example, iMovie). Usually, any app that records voice memos will do fine for creating your separate audio files.
5. Upload your video and share it with your students
At VB, we’ve found that the best way to transfer your video from an iPad over to a computer is to use a Lightning-USB cable and copy the video file(s) directly to the computer from the iPad’s memory.
If you’ve used a Mac or PC to capture your video, the video will already be stored on your computer, so you can skip this first step!
Next, you can choose how and where to upload your video. Google Drive is likely the best choice for this if you’re a student or instructor, since many institutions use Google Accounts for school emails already. Please keep Visible Body’s content use guidelines in mind when considering where to upload your video. For example, if you’re an instructor who has a private YouTube channel or playlist just for your students, it would be fine to upload videos there.
You can easily incorporate the link to your video into Courseware by creating a link assignment. To do so, click the “New Assignment” button, then select Link/URL from the My Content header. Then copy and paste the video link into the appropriate box on the assignment creation screen and either save your assignment as a draft or publish it right away for your students to view.
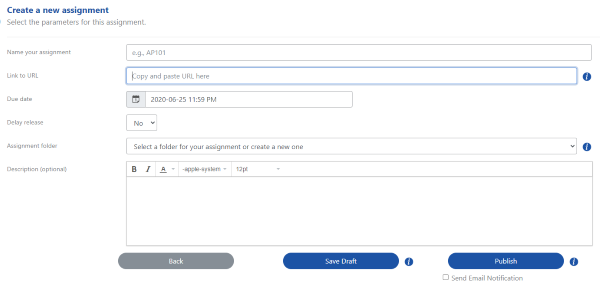 Creating a link assignment in Courseware is a simple way to incorporate your own content into a course.
And there you have it—five simple steps for making your very own Atlas videos! Happy teaching!
Be sure to subscribe to the Visible Body Blog for more anatomy awesomeness!
Are you an instructor? We have award-winning 3D products and resources for your anatomy and physiology course! Learn more here.

