Copying a Courseware Course for a New Semester in 4 Easy Steps
If you used Visible Body Courseware last semester and customized a premade course or made your own from scratch, you might be wondering, “Will I have to do all of that again?” We’ve got great news for you—if you want to use the same Visible Body Courseware course for this coming semester, you won’t have to re-make any assignments! All you have to do is make a copy of your course and adjust some assignment due dates.
Matt Walsh from the Customer Engagement Team gave a tutorial and Q&A session about how to copy a course you’ve already made so you can use it in a future semester.
Here’s the full video:
Check out the Visible Body Webinar Series playlist on YouTube for more tech and teaching tips!
Below, we’ll give a quick summary of the course-copying process, as well as some Q&A highlights and tips for making your transition to the new semester as smooth as possible.
1. Log in and find the course you want to copy.
The first step to copying your course is to log in to VB Courseware. This will bring you to the My Courses page, where you can see all the courses you’ve added to your account.
Find the course you want to copy and then click the triangle button in its corresponding row.
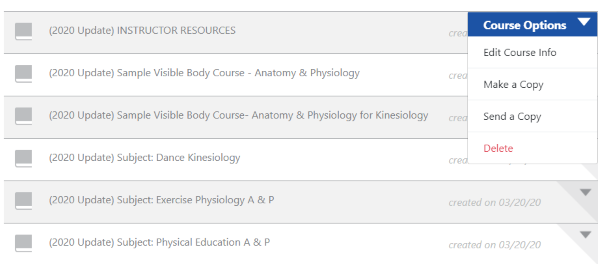 Copying a course from the My Courses page in Visible Body Courseware.
Select “Make a copy” from the dropdown. You’ll see a screen that looks like this:
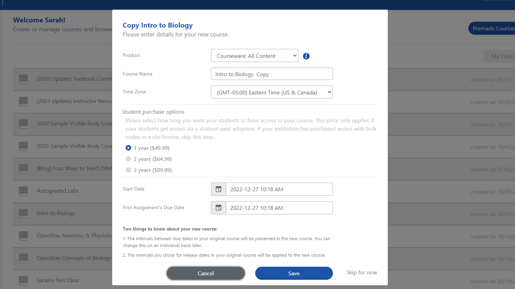
The menu for copying a course in Visible Body Courseware.
This screen allows you to change the title of the course, set a new start date, and establish the first assignment’s due date. The intervals between assignment due dates will remain the same as it was in the original version of the course. This means that if you have assignments due every week, they will still be due every week, beginning with the first due date you establish.
2. Edit your new course.
All the assignments in your new course (the copy) will be the same as they were in the original course. However, you might want to make sure that the new assignment due dates take holidays and breaks into account. You can go into any assignment and change its due date as necessary. You can also use the Bulk Editing feature if you want to change the due dates of multiple assignments at the same time.
How to use the Bulk Editing tool in Visible Body Courseware.
Speaking of Bulk Editing, here’s another quick note to keep in mind: all the assignments will copy over to the new course as unpublished. This means that they will need to be published (either right away or on a specific release date) in order for students to see them. (Use the Student Preview button at the top of the screen if you want to preview your course from a student perspective.) You can use the bulk editing tool to publish assignments and folders right away, or schedule them for future publication.
You can also add or remove assignments as you like in your new course.
Pro tip! You can mix and match assignments from different courses by copying folders (without copying the whole course they belong to). In any course, click the triangle button that corresponds to a folder and select “Copy folder” in the dropdown.
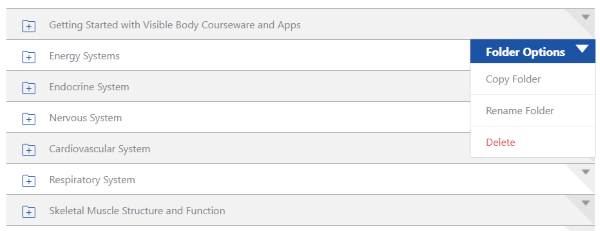 How to copy a folder in Visible Body Courseware.
Then, you’ll be prompted to select the course you want to add the copied folder into.
3. Link your new copied course with Canvas.
Once you’ve got your new course all set up in Courseware, it’s time to connect it to Canvas. If you don’t use Canvas or the Canvas SSO with Courseware, you can skip ahead to the next step.
Learn more about the Courseware Canvas integration.
To link your new Courseware course with Canvas, log in to the Canvas course you want to link the Courseware one to and select “Visible Body Courseware” from the menu on the left-hand side of the screen. You might be prompted to sign in to Courseware. After that, all you need to do is select your Courseware course from the dropdown on the next screen, as shown in the video above.
All this is assuming that your Canvas and Courseware accounts are already linked. Check out this Courseware support article (and watch the beginning of the video above) if this is your first time setting up the Canvas integration.
4. Invite students to your new course.
Once your new course is ready, it will be time to invite students to it. You’ll notice that when you copy the original course, none of the student information (such as the Roster or Gradebook) carries over to the new version. You can still see all of that information by opening the original course, so don’t worry! Nothing gets lost in transit when you copy a course.
This just means that you’ll need to add students to the new copy of the course the same way you would for any other, following these three simple steps:
- Select your course from the “My Courses” page.
- On the Assignments Page of the course, select “Invite People” from the menu on the left.
- Copy the link on the next screen and email or post the course link on your syllabus or LMS of choice to invite students to this course.
(By the way, if your students haven’t used Courseware before, or if they just need a refresher, you can share this onboarding article with them!)
Q&A Highlights
Here are two questions from the Q&A that aren’t directly involved in any of the course-copying steps but are definitely helpful for instructors.
What if the spring course is a continuation of the fall course?
If your Spring course is a continuation of your Fall course (as would be the case with a two-semester A&P course), you can keep going with the same course, provided that all the same students are enrolled.
If new students join the course, it’s best to make a copy of the course and use it specifically for the new students.
Are assignment due dates in EST or in local time?
Usually, when you create a course, all assignment due dates are in whatever time zone you’re in. For on campus courses, this isn’t usually an issue. However, with online courses, it’s possible that students will be completing assignments from various locations.
If you want to change the time zone on your assignment due dates (and publication/release dates), use the triangle button and dropdown on the My Courses page and select Edit Course Info. That will give you the option to select your time zone or just double-check that you’re in the right one.
And that’s all, folks! We wish you a smooth transition into the next semester. As always, if you need any help preparing your Courseware materials for next semester, our support team is happy to assist. Simply fill out our contact form, and we’ll get back to you ASAP.
Be sure to subscribe to the Visible Body Blog for more anatomy awesomeness!
Are you an instructor? We have award-winning 3D products and resources for your anatomy and physiology course! Learn more here.

